Phase V - Model deployment
Course: MLOps engineering
Author: Firas Jolha
Agenda
Description
After training your machine learning model and ensuring its performance, the next step is deploying it to a production environment. The deployment phase of a ML model is characterized by its practical use in the designated field of application.
This process can be complex, but MLflow simplifies it by offering an easy toolset for deploying your ML models to various targets, including local environments, cloud services, and Kubernetes clusters.
An MLflow Model already packages your model and its dependencies, hence MLflow can create either a 1. virtual environment (for local deployment) or a 2. Docker container image containing everything needed to run your model.
[Local] deployment
Before deploying the model, make sure that you have created a model and logged it as an MLflow model and registered in MLflow Model registry. In addition, you need to have only one model whose alias is champion. You should deploy only this model.
MLflow launches an inference server with REST endpoints using frameworks like Flask, preparing it for deployment to various destinations to handle inference requests. MLflow provides CLI commands and Python APIs to facilitate the deployment process. Deployment-related commands are primarily categorized under two modules:
mlflow models- typically used for local deployment.mlflow deployments- typically used for deploying to custom targets.
Here we will use only the first option. You can deploy your champion MLflow model random_forest@champion locally and run it in the local virtual environment on the localhost port 5151 as follows:
mlflow models serve --model-uri models:/random_forest@champion --env-manager local -h localhost -p 5151
This will deploy a local inference server which runs a Flask app and allows to make predictions. The inference server provides 4 REST endpoints which are:
/invocations: An inference endpoint that accepts POST requests with input data and returns predictions./ping: Used for health checks./health: Same as/ping./version: Returns the MLflow version.
By default, MLflow uses Flask, a lightweight WSGI web application framework for Python, to serve the inference endpoint.
You can make predictions by sending POST requests with the features data to the endpoint /invocations as follows:
curl -X POST localhost:5151/invocations -H 'Content-Type: application/json' --data '{"inputs":{"0":1.0692827453,"1":0.8284868806,"2":-0.2393840854,"3":0.8518639213,"4":-0.7616964257,"5":-0.6128551918,"6":0.0,"7":0.0,"8":0.0,"9":0.0,"10":0.0,"11":1.0,"12":0.0,"13":0.0,"14":0.0,"15":0.0,"16":0.0,"17":0.0,"18":0.0,"19":1.0,"20":0.0,"21":0.0,"22":0.0,"23":1.0,"24":0.0,"25":1.0,"26":0.0,"27":0.0,"28":0.0,"29":0.0,"30":0.0,"31":1.0,"32":1.0,"33":0.0,"34":1.0,"35":0.0,"36":1.0,"37":0.0,"38":0.7907757369,"39":-0.6121059825,"40":0.5,"41":0.8660254038}}'
You should pass data with the same schema as defined in model signature. You can find the signature and an input example in MLmodel andinput_example.json files.
You can do the same in Python API as follows:
import json
import requests
import hydra
from model import load_features

@hydra.main(config_path="../configs", config_name="main", version_base=None) # type: ignore
def predict(cfg = None):

    X, y = load_features(name = "features_target",
                        version = cfg.example_version,
                        random_state=cfg.random_state
                        )

    example = X.iloc[0,:]
    example_target = y[0]

    example = json.dumps(
    { "inputs": example.to_dict() }
    )

    payload = example

    response = requests.post(
        url=f"http://localhost:{cfg.port}/invocations",
        data=payload,
        headers={"Content-Type": "application/json"},
    )

    print(response.json())
    print("encoded target labels: ", example_target)
    print("target labels: ", list(cfg.data.labels)[example_target])


if __name__=="__main__":
    predict()
Add this as an entry point predict to MLproject. You can run this entry point as follows:
mlflow run . --env-manager local -e predict -P example_version=v4 -P port=5151 -P random_state=12
This entry point will take a random sample of features and predict it using the deployed API. It looks like as follows in MLproject file.
entry_points:

...

    predict:
    parameters:
      example_version:
        type: string
        default: "v5"
      port:
        type: float
        default: 5151
      random_state:
        type: float
        default: 1
    command: "python src/predict.py ++example_version={example_version} ++port={port} ++random_state={random_state}"
# mlflow run . --env-manager local -e predict -P example_version=v4 -P port=5151
[Local] Serving MLflow model in Docker
The essential step to deploy an MLflow model to Kubernetes is to build a Docker image that contains the MLflow model and the inference server. This can be done via build-docker CLI command or Python API. The steps for deploying our MLflow model in a Docker container are:
- Generate the
Dockerfilefor deploying MLflow model.
mlflow models generate-dockerfile --model-uri models:/random_forest@champion --env-manager local -d api
This generates a directory with Dockerfile whose default entrypoint serves an MLflow model at port 8080 using the python_function flavor. The generated Dockerfile is written to the specified output directory api, along with the model. This Dockerfile defines an image that is equivalent to the one produced by mlflow models build-docker.

- Build the docker image.
docker build -t my_ml_service .
You can actually build a docker image in MLflow without creating a Dockerfile with a single command line as follows:
mlflow models build-docker -m <model-uri> --env-manager local -n <image_name>
# Example:
# <model-uri>: models:/random_forest@champion
# --env-manager local: will use the current local virtual environment for building the image
# <image_name>: only a name given to the image
- Run the container
 docker run --rm -p 5152:8080 my_ml_service
 # --rm will remove the container after we stop the container.
 # -p is used to map the port 8080 inside the container to the port 5152 on the local machine.
 # Feel free to change 5152 to another port number but do not change the port 8080 (default port)
 # my_prediction_service: is image name
- Push the image to your dockerhub registry.
- Create an account on Dockerhub.
- Login to your account in your local machine
docker login - Tag the image.
# latest is default version docker tag my_ml_service <username-on-dockerhub>/my_ml_service # specific version docker tag my_ml_service <username-on-dockerhub>/my_ml_service:v1.0 - Push the image to dockerhub.
docker push <username-on-dockerhub>/my_ml_service:latest
Flask
Flask is a powerful and flexible micro web framework for Python, ideal for both small and large web projects. It provides a straightforward way to get a web application up and running, with all the features that you need to get started. Here we will use Flask to build an API for our model. We can define endpoints as functions decorated with @app.route. Each function decorated as an endpoint should return some response to the requests made to these endpoints.
Install Flask
pip install Flask==2.2.5
Demo
# api/app.py

from flask import Flask, request, jsonify, abort, make_response

import mlflow
import mlflow.pyfunc
import os

BASE_PATH = os.path.expandvars("$PROJECTPATH")

model = mlflow.pyfunc.load_model(os.path.join(BASE_PATH, "api", "model_dir"))

app = Flask(__name__)

@app.route("/info", methods = ["GET"])
def info():

	response = make_response(str(model.metadata), 200)
	response.content_type = "text/plain"
	return response

@app.route("/", methods = ["GET"])
def home():
	msg = """
	Welcome to our ML service to predict Customer satisfaction\n\n

	This API has two main endpoints:\n
	1. /info: to get info about the deployed model.\n
	2. /predict: to send predict requests to our deployed model.\n

	"""

	response = make_response(msg, 200)
	response.content_type = "text/plain"
	return response

# /predict endpoint
@app.route("/predict", methods = ["POST"])
def predict():

    # EDIT THIS ENDPOINT

    # EXAMPLE
	content = str(request.data)
	response = make_response(content, 200)
	response.headers["content-type"] = "application/json"
	return jsonify({'result': 'yes', 'prob': '0.7'})

# This will run a local server to accept requests to the API.
if __name__ == "__main__":
    port = int(os.environ.get('PORT', 5001))
    app.run(debug=True, host='0.0.0.0', port=port)
Web UI
After we publish the prediction service as an API. We need to build a cool UI to let users submit requests to the API via the UI. Here we will use Gradio to build one interface for our ML service.
Install Gradio
You can install this tools as a Python package. I do not suggest to install latest version. For Python 3.11, the Gradio version 3.50.2 does not introduce conflicts.
pip install gradio==3.50.2
You can check other versions if this will create conflicts.
Gradio is a tool to easily interact with deployed machine learning models. For the project, you can use Gradio or other tools like Streamlit if you prefer.
Demo
# src/app.py

import gradio as gr
import mlflow
from utils import init_hydra
from model import load_features
from transform_data import transform_data
import json
import requests
import numpy as np
import pandas as pd

cfg = init_hydra()

# You need to define a parameter for each column in your raw dataset
def predict(age = None,
            job = None,
            marital = None,
            education = None,
            default = None,
            balance = None,
            housing = None,
            loan = None,
            contact = None,
            day_of_week = None,
            month = None,
            duration = None,
            campaign = None,
            pdays = None,
            previous = None,
            poutcome = None):

    # This will be a dict of column values for input data sample
    features = {"age": age,
        "balance": balance,
        "duration": duration,
        "campaign": campaign,
        "pdays": pdays,
        "previous": previous,
        "default": default,
        "housing": housing,
        "loan": loan,
        "day_of_week" : day_of_week,
        "month": month,
        "job": job,
        "marital": marital,
        "education": education,
        "contact": contact,
        "poutcome": poutcome
    }

    # print(features)

    # Build a dataframe of one row
    raw_df = pd.DataFrame(features, index=[0])

    # This will read the saved transformers "v4" from ZenML artifact store
    # And only transform the input data (no fit here).
    X = transform_data(
                        df = raw_df,
                        cfg = cfg,
                        return_df = False,
                        only_transform = True,
                        transformer_version = "v4",
                        only_X = True
                      )

    # Convert it into JSON
    example = X.iloc[0,:]

    example = json.dumps(
        { "inputs": example.to_dict() }
    )

    payload = example

    # Send POST request with the payload to the deployed Model API
    # Here you can pass the port number at runtime using Hydra
    response = requests.post(
        url=f"http://localhost:{port_number}/invocations",
        data=payload,
        headers={"Content-Type": "application/json"},
    )

    # Change this to some meaningful output for your model
    # For classification, it returns the predicted label
    # For regression, it returns the predicted value
    return response.json()

# Only one interface is enough
demo = gr.Interface(
    # The predict function will accept inputs as arguments and return output
    fn=predict,

    # Here, the arguments in `predict` function
    # will populated from the values of these input components
    inputs = [
        # Select proper components for data types of the columns in your raw dataset
        gr.Number(label = "age"),
        gr.Text(label="job"),
        gr.Text(label="marital"),
        gr.Text(label="education"),
        gr.Dropdown(label="default", choices=["no", "yes"]),
        gr.Number(label = "balance"),
        gr.Dropdown(label="housing", choices=["no", "yes"]),
        gr.Dropdown(label="loan", choices=["no", "yes"]),
        gr.Text(label="contact"),
        gr.Text(label="day_of_week"),
        gr.Text(label="month"),
        gr.Number(label = "duration"),
        gr.Number(label = "campaign"),
        gr.Number(label = "pdays"),
        gr.Number(label = "previous"),
        gr.Text(label="poutcome"),
    ],

    # The outputs here will get the returned value from `predict` function
    outputs = gr.Text(label="prediction result"),

    # This will provide the user with examples to test the API
    examples="data/examples"
    # data/examples is a folder contains a file `log.csv`
    # which contains data samples as examples to enter by user
    # when needed.
)

# Launch the web UI locally on port 5155
demo.launch(server_port = 5155)

# Launch the web UI in Gradio cloud on port 5155
# demo.launch(share=True, server_port = 5155)
CI/CD pipelines using Github Actions
In 2019, GitHub released its own CI tool called GitHub Actions. According to GitHub, Actions make it easy for developers to automate tasks within the software development life cycle (SDLC). The native ecosystem integration enables projects to be automated from the moment developers commit code for deployment into production.
Concepts
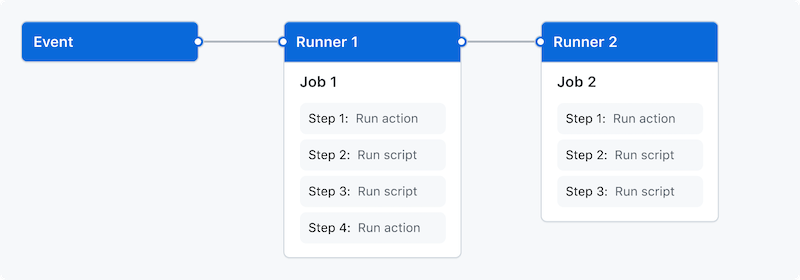
- Workflow: A configurable automated process that will run one or more jobs. Workflows are defined by a YAML file within your repo and will run when triggered by an event in your repo. They can also be triggered manually, or with a defined schedule. Workflows are defined in the .github/workflows directory in a repo, and we can have multiple workflows per repo, each of which can perform a different set of tasks.
- Event: An activity that triggers a workflow; these can be based on events such as push or pull requests, but they can also be scheduled using the crontab syntax.
- Job: A task in a single workflow. A workflow may consist of one or more jobs, and all jobs need to execute without any errors in order for a workflow to be successful.
- Step: A smaller task that is executed within a job. All steps must be completed in order to complete a job.
- Action: A standalone command performed in a step. You can write your own Actions, or you can find Actions to use in your workflows in the GitHub Marketplace.
- Runner: A server that runs your workflows when they’re triggered. Each runner can run a single job at a time. GitHub provides Ubuntu Linux, Microsoft Windows, and macOS runners for workflows; each workflow run executes in a fresh, newly-provisioned virtual machine.
We define the workflows as .yaml or .yml files in .github/workflows folder of the Github project repository.
Example
# .github/workflows/test-code.yaml

# Name of the workflow
name: Example testing

# Trigger when?
on: # Event
  push: # this will trigger the workflow/pipeline only if there is push on `main` branch
    branches:
      - main
    paths: # the push should be specifically to the folders `src` or `scripts` to trigger this workflow, otherwise, the workflow will not be triggered
      - 'src'
      - 'scripts'
   schedule: # Run this workflow on a scheduled manner given the cron expression (This is a second event to trigger the workflow)
     - cron: '*/5 * * * *'

# Allows to only read the contents of the repository
# `contents: read` permits an action to list the commits
# `contents: write` allows the action to create a release
permissions:
  contents: read

# Decalre environment variables to be used in this workflow file
env:
  message: "Testing code!"

# Tasks
jobs:

  # Task name
  test-code:

    # OS to run the task
    runs-on: ubuntu-latest # The ubuntu-latest label currently uses the Ubuntu 22.04 runner image
    # for more info about the given resources, check this link below
    # https://docs.github.com/en/actions/using-github-hosted-runners/about-github-hosted-runners/about-github-hosted-runners#standard-github-hosted-runners-for-public-repositories

    defaults: # Set working directory of the job
      run:
        shell: bash # Set the default shell
        working-directory: .

    # The steps of the task/job
    steps:

        # Task name
      - name: Checking out our code
        # Action type
        # This action check out the repository in the runner.
        uses: actions/checkout@v4
        # for more info, check the link below
        # https://github.com/actions/checkout

        # Install a version of Python
      - name: setup python
        uses: actions/setup-python@v5
        # for more info, check the link below
        # https://github.com/actions/setup-python

        # Install this specific version 3.11.0 of Python
        with:
          python-version: '3.11.0'
          cache: 'pip' # caching pip dependencies

        # Install Python packages
      - name: install python packages

        # `run` allows to run shell commands
        # We can use operator `|` for a multi-line command
        run: |
            python3.11 -m pip install --upgrade pip
            pip3.11 install -r installed_requirements.txt

        # You do not need to create a virtual environment here, just use the global installation of Python
        # Check if requirements.txt file is there
        #    if [ -f requirements.txt ]; then pip install -r requirements.txt; fi

      # Task name
      - name: Run your app

      # A one-line shell command
      # This will run the application in the background
      # It is useful for apps which block the shell
      # to allow next commands to run
        run: python3.11 src/app.py &

      - name: Export variables
        run: |
          echo $PWD
          export ZENML_CONFIG_PATH=$PWD/services/zenml
          export PROJECTPATH=$PWD
          export AIRFLOW_HOME=$PWD/services/airflow
          export PYTHONPATH=$PWD/src

      - name: Run ZenML server
        run: zenml down && zenml up

      # Run pytest on tests folder
      - name: Test with pytest
        run: pytest tests


  # Another job
  print_info:

      runs-on: ubuntu-latest

      # Run this job after running the job `test-code`
      # This allows to set dependency between the jobs
      needs: test-code


      steps:

        # Print passwords and some variables defined on Github website
        - name: print my password
          run: |
            echo My password is ${{ secrets.PASSWORD }}
            echo My name is '${{ vars.NAME }}'

        # Print some message defined as environment variable
        - name: print message
          run: echo $message
Project tasks
Note: The project tasks are graded, and they form the practice part of the course. We have tasks for repository and as well as for report (for Master’s student).
Here we deploy only the champion model from phase 4.
A. Repository
- Create a folder
apiand add a fileapi/app.py. - Generate
api/Dockerfilefor deploying your model locally in a docker container usingmlflow modelscommand. - Build the docker image and run the docker container. Check the health of the service using
/pingendpoint. Push the image to your dockerhub. The deployed API now should accept requests for prediction. Add the commands to build the image, deploy the container and push to Dockerhub in a script filescripts/deploy_docker.sh. Add an entry pointdeploytoMLprojectfile to run this script. You can run this entry point as:
mlflow run . --env-manager local -e deploy
- Add an entry point
predicttoMLprojectfile to fetch a random feature sample of versionexample_versionand run predictions on the deployed API hosted on a specific portportinhostname=localhost. This will call a functionpredictfrom a modulesrc/predict.py. The entry pointpredictis defined as follows:
# MLproject

entry_points:

...

    predict:
    parameters:
      example_version:
        type: string
        default: "v5"
      hostname:
        type: string
        default: "hostname"
      port:
        type: float
        default: 5151
      random_state:
        type: float
        default: 1

    # src/predict.py is decorated with @hydra.main to pass parameters at runtime
    command: "python src/predict.py ++example_version={example_version} ++hostname={hostname} ++port={port} ++random_state={random_state}"

# The command to run is:
# mlflow run . --env-manager local -e predict -P example_version=v4 -P port=5151 -P random_state=14
- Take a sample from each version (out of 5) and test your prediction service. You should not get issues per sample version. Add these commands to a script
scripts/predict_samples.sh. - Create a Flask API of 2 endpoints in
api/app.py. The endpoint/predict(HTTP request method is POST) accepts a json of feature values and returns a json of prediction result. The endpoint/info(HTTP request method is GET) takes no arguments and returns the model metadata (from MLflow model registry). You can also use FastAPI if you prefer. Run the App server on local host on a specific port. - [Optional] Deploy the Flask app to some cloud service like Vercel.com, Fly.io,…etc.
- Test the Flask API by using
curlcommand to send POST requests with data to/predictentry point. - Build a UI using Gradio which allows users to enter raw input, then shows prediction results. The Gradio app should use the locally deployed Flask API to make predictions (Optionally use API deployed on the cloud). Deploy the Web UI on our local sever or to Gradio cloud (
share=True). - Build a CI/CD pipeline
.github/workflows/test-code.yamlusing Github actions to run all tests intestsfolder. You can useubuntu-latest(22.04) image from Github. Add the badge to your README file about the status of your pipeline. You can do that by adding such following markdown text toREADME.mdfile.

# Example
# https://github.com/firas-jolha/my-repo/actions/workflows/test-code.yaml/badge.svg
- Build another CI/CD pipeline
.github/workflows/validate-model.yamlusing Github actions to validate the best champion model using Giskard. - [Optional] Build another CI/CD pipeline
.github/workflows/validate-data.yamlusing Github actions to test the dagdata_extract_dagfor one time/sample, then it tests the ZenML pipeline for one time/sample. - All pipelines are set to be triggered with a
pushevent to themainbranch when any file in one of the directoriessrc, scripts, services/airflow/dags, tests, configs, .githubare changed in the repository. Make sure that you get such output as shown below.

FINAL THOUGHT ARE BELOW ![]()
You can deploy your Flask API in a docker container but this is an optional task.
B. Report [Only for Master’s students]
Complete the following chapters:
- Chapter 6: Model deployment
- The deployment phase of a ML model is characterized by its practical use in the designated field of application.
- Define inference hardware.
- Describe the resource you have to deploy your model.
- Model evaluation under production condition: Check whether the business and economic success criteria are met.
- Test your model on different samples of the data and check its performance.
- Compare the performance results and make a decision whether you succeeded in meeting the business succes criteria.
- Deployment strategy: Describe your deployment methods and how you deployed your model.
Final thoughts/tasks
- Organize your repository in Github. Add documentation in README files. Keep your code clean and maintainable.
- Add instructions to the main readme file, on how to
- Deploy your best model using your Flask API.
- Deploy your best model in a docker container.
- Run the Gradio web UI which sends HTTP requests.
- Make sure that you merged your other branches with
mainbranch since onlymainbranch will be graded. - Make sure that you pushed all required metadata, reports and files to Github fo grading purposes.
- Check that your CI/CD pipelines are
passing.
IMPORTANT: The Model monitoring phase will be skipped in this project for simplicity and only for the semester Summer 2024. The full points of this phase will be awarded to the teams who successfully finish all previous 5 phases. The full points are points for Bachelor’s students, and points for Master’s students.
Review
Docker and Docker compose
Docker is a set of platform as a service (PaaS) products that use OS-level virtualization to deliver software in packages called containers.
In simpler words, Docker is a tool that allows to easily deploy the applications in a sandbox (called containers) to run on the host operating system i.e. Linux.
The key benefit of Docker is that it allows users to package an application with all of its dependencies into a standardized unit for software development. Unlike virtual machines, containers do not have high overhead and hence enable more efficient usage of the underlying system and resources.
The industry standard today is to use Virtual Machines (VMs) to run software applications. VMs run applications inside a guest Operating System, which runs on virtual hardware powered by the server’s host OS.
VMs are great at providing full process isolation for applications: there are very few ways a problem in the host operating system can affect the software running in the guest operating system, and vice-versa. But this isolation comes at great cost — the computational overhead spent virtualizing hardware for a guest OS to use is substantial.
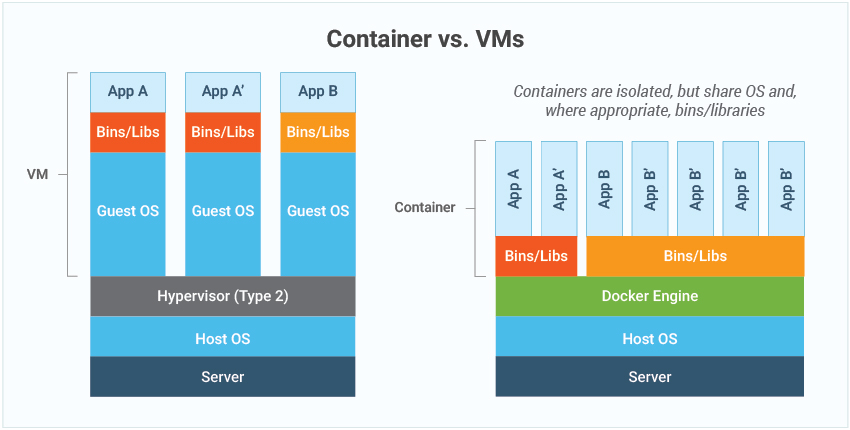
Containers take a different approach, by leveraging the low-level mechanics of the host operating system, containers provide most of the isolation of virtual machines at a fraction of the computing power.
- Dockerfile is a simple text file that contains a list of instructions that the Docker client calls while creating an image.

- Docker image is an artifact with several layers and a lightweight, compact stand-alone executable package that contains all of the components required to run a piece of software, including the code, a runtime, libraries, environment variables, and configuration files.
- Docker container is a runtime instance of an image.
Install docker and docker compose
The official website has a good tutorial to download and install both tools. I share here some of the tutorials:
After you install the tools, use the docker command to run hello-world container as follows:
docker run hello-world
This command line will download the docker image hello-world for the first time and run a container.
Note: If docker is not running due to restrictions in Russia, then add a mirror to the configuration of the docker daemon (daemon.json). The guide is in this link https://dockerhub.timeweb.cloud/.

Dockerfile definition [extra section]
Dockerfile contains the instructions to build a Docker image. Here we show only some of these instructions.
# Represents the base image, which is the command that is executed first before any other commands.
FROM <ImageName>

# used to copy the file/folders to the image while building the image.
# Source; is the location of the file/folders in the host  machine
# Destination: is the location of the file/folders in the container
COPY <Source> <Destination>

# does the same as COPY. Additionally it lets you use URL location to download files and unzip files into the image
ADD <URL> <Destination>

# Runs scripts and commands in the container. The execution of RUN commands will take place while you create an image on top of the prior layers (Image). It is used to install packages into container, create folders, etc
RUN <Command + ARGS>

# allows you to set a default command which will be executed only when you run a container without specifying a command. If a Docker container runs with a command, the default command will be ignored, so it can be overridden. There can be only one CMD in the dockerfile.
CMD [command + args]

# A container that will function as an executable is configured by ENTRYPOINT. When you start the Docker container, a command or script called ENTRYPOINT is executed. It ca not be overridden.The only difference between CMD and ENTRYPOINT is CMD can be overridden and ENTRYPOINT can’t.
ENTRYPOINT [command + args]

# identifies the author/owner of the Dockerfile
MAINTAINER <NAME>

# sets environment variables inside the container
ENV VAR VALUE

# defines build-time variable.
ARG VAR VALUE

# info to expose ports outside the container
EXPOSE PORT

# info to create a directory mount point to access and store persistent data
# PATH here is container path
VOLUME [PATH]

# sets the working directory for the instructions that follow
WORKDIR SOME_CONTAINER_PATH
Demo
Here we will create a simple Flask app, dockerize it and push it to Docker hub.
- Prepare the following files.
- requirements.txt: contains the app dependencies.
app.py: contains the Flask app code.- Dockerfile: contains the instructions to build a Docker image.
# requirements.txt

Flask
# app.py

from flask import Flask
import os

app = Flask(__name__)

@app.route("/")
def hello():
    return "Hello World!"

if __name__ == "__main__":
    port = int(os.environ.get('PORT', 5000))
    app.run(debug=True, host='0.0.0.0', port=port)
# Dockerfile

# Base image
FROM python:3.8-alpine

# Switch to another directory
# CWD is /usr/src/app
WORKDIR /usr/src/app

# Copy the requirements.txt to CWD
COPY requirements.txt ./

# Install the dependencies in requirements.txt
RUN pip install --no-cache-dir -r requirements.txt

# Copy the code and everything in CWD of the host to CWD of the container
COPY . .

# Make the Docker container executable
ENTRYPOINT ["python"]

# Specify the default command line argument for the entrypoint
CMD ["app.py"]

# This will be based to the default entry point
# CMD [ "python", "./app.py" ]
- Build the image with tag
flask_webservice.
docker build -t flask_webservice .
- Run the container on port 5000. Add a name to the container
flask_webservice.
docker run -d -p 5000:5000 --name test_webservice flask_webservice
The option -p is used to map ports between the host and the container. The option -d is used to detach the shell from the container such that it will run in the background and will not block the shell.
- Some other commands.
# Stops the container
docker stop <container-id-name>

# Stops the container
docker rm <container-id-name>

# shows all running containers
docker ps
- Add a volume if you are debugging the application.
docker run -p 5000:5000 --name test_service -v .:/usr/src/app --rm flask_webservice
A Docker volume is an independent file system entirely managed by Docker and exists as a normal file or directory on the host, where data is persisted.
- Create a repository on Docker hub

- Log in on your local machine
docker login
Enter the username and password.
- Add a tag to the docker image before pushing
docker tag flask_webservice firasj/dummy_flask_service:v1.0
- Push to Docker Hub
docker push firasj/dummy_flask_service:v1.0
Whenever you made changes, you can build then push another version/tag to Docker hub.
- Access the container via terminal
docker exec -i -t test_service bash
If you pass to the previous command app.py instead of bash, then the container will run the python as follows:
python app.py
If we pass a different application app2.py, the container will run the python as follows:
python app2.py
If the docker command asks for sudo permission everytime you use it, run the following:
sudo chmod 777 /var/run/docker.sock
This will give permissions to everyone to run docker (could be risky for multi-user environments).
Docker Compose
Docker Compose is a tool for defining and running multi-container applications.
You can find below some tutorials to learn Docker and Docker compose.
https://learnxinyminutes.com/docs/docker/
A tutorial to learn Docker
https://docker-curriculum.com/#docker-compose
A tutorial to learn Docker compose