Lab 8 - Apache Spark MLlib
Course: Big Data - IU S25
Author: Firas Jolha
Agenda
Objectives
- Run Spark application on a cluster
- Learns methods to extract features in spark MLlib
- Apply TF-IDF feature extraction for description of movies
- Perform some regression tasks in spark MLlib
- Perform some classification tasks in spark MLlib
- Perform distributed deep learning on a cluster
Hadoop YARN
YARN(Yet Another Resource Negotiator) is cluster resource management system for Hadoop. YARN was introduced in Hadoop 2 to improve the MapReduce implementation and eliminate Hadoop 1 scheduling disadvantages. YARN is a connecting link between high level applications(Spark, HBase e.t.c) and low level Hadoop environment. With introduction of YARN, Hadoop transformed from only MapReduce framework to big data processing core. Some people characterized YARN as a large-scale, distributed operating system for big data applications.
Anatomy of Yarn
YARN provides its core services via two types of long-running daemons:
1. Resource Manager (one per cluster) is responsible for tracking the resources in a cluster, and scheduling applications. Actually it responses to resource requests from Application Master (one per each Yarn application), via requesting to Node Managers. It does not monitor and collect any job history. It is only responsible for cluster scheduling. Actually Resource Manager is a single point of failure but Hadoop2 support High Availability which can restore ResourceManager data in case of failures.
2. Node Manager (one per every node) is responsible to monitor nodes and containers (slot analogue in MapReduce 1) resources such as CPU, Memory, Disk space, Network e.t.c. It also collects log data and report that information to the Resource Manager.
Application Master (one per Yarn application) is another important component of Yarn. It actually runs in a separate container process on a slave node. It has one instance per application, instead of JobTracker, which was a single daemon that runs on a master node and tracks the progress of all applications which was a point of failures. Application Master is responsible to send heartbeat messages to the ResourceManager with its status and the state of the application’s resource needs. Hadoop2 supports uber (lightweight) tasks which can be run by Application Master on same node, without wasting time for allocation. Application Master should be implemented for each Yarn application type, in case of MapReduce it designed to execute map and reduce tasks.
Steps to run Yarn application
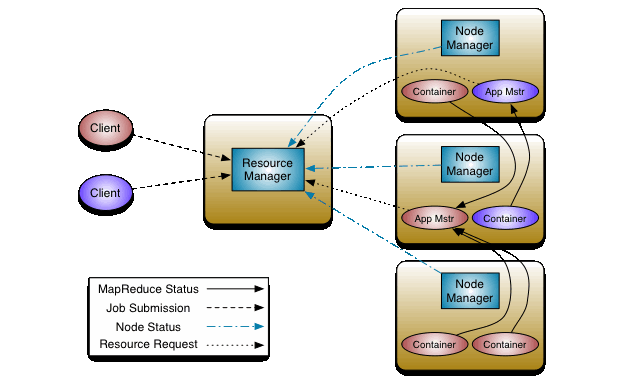
- Client does a request to Resource Manager (RM) to run application.
- RM requests Node Managers to allocate container for creating Application Master (AM) instance on available (which has enough resources) node.
- When Application Master (AM) instance already run, itself send requests (heartbeat, app resource needs,…) to RM and manage the application.
Run spark application on the cluster
In the previous lab, we used master("local[*]") to run the spark application but the execution was done on the local machine and not on the cluster (where * means to use as many CPU cores as exist). Apache Spark supports multiple cluster managers, including standalone spark manager, Hadoop YARN, Mesos,…etc. In this lab, we will use Hadoop YARN to manage the cluster and will learn how we can track the status of Spark jobs on Spark UI.
You need to create a Zeppelin note where the default interpreter is spark2. To specify the cluster manager as Yarn, make sure that yarn-client is specified as master in the configuration of the interpreter. In yarn-client mode, the driver runs in the client process, and the application master is only used for requesting resources from YARN.
Spark supports two modes for running on YARN, “yarn-cluster” mode and “yarn-client” mode. Broadly, yarn-cluster mode makes sense for production jobs, while yarn-client mode makes sense for interactive and debugging uses where you want to see your application’s output immediately.

Yarn client mode

Yarn cluster mode
Apache Spark MLlib
In Spark, we have two different MLlib APIs, The old API which is RDD-based (pyspark.mllib) and the new API which is DataFrame-based (pyspark.ml). As of Spark 2.0, the RDD-based APIs in the pyspark.mllib package have entered maintenance mode. The primary Machine Learning API for Spark is now the DataFrame-based API in the pyspark.ml package.
Basic data structures in Spark MLlib
Spark MLlib supports local vectors and matrices stored on a single machine, as well as distributed matrices backed by one or more RDDs.
Local vector
A local vector has integer-typed and 0-based indices and double-typed values, stored on a single machine. MLlib supports two types of local vectors: dense and sparse. A dense vector is backed by a double array representing its entry values, while a sparse vector is backed by two parallel arrays: indices and values. For example, a vector (1.0, 0.0, 3.0) can be represented in dense format as [1.0, 0.0, 3.0] or in sparse format as (3, [0, 2], [1.0, 3.0]), where 3 is the size of the vector. MLlib recognizes NumPy’s array and Python’s list as dense vectors. You can create sparse vectors using MLlib’s Vectors.SparseVector.
#  Create Spark Context

# Import SparkSession
from pyspark.sql import SparkSession

# Create SparkSession
spark = SparkSession \
        .builder \
        .appName("my spark app") \
        .master("yarn")  \
        .getOrCreate()
# run the application on Yarn

sc = spark.sparkContext
from pyspark.mllib.linalg import Vectors as Vectors1
from pyspark.ml.linalg import Vectors as Vectors2

# Create a SparseVector.
sv1 = Vectors1.sparse(3, [0, 2], [1.0, 3.0])
print(sv1)

# Create a SparseVector.
sv2 = Vectors2.sparse(4, [0, 2], [1.0, 3.0])
sv3 = Vectors2.dense([0, 1.0, 0.0, 3.0])
print(sv2)
print(sv2.toArray())
print(sv2.indices)
print(sv2.values)
print(sv2.norm(1)) # p = 1
print(sv2.norm(2)) # p = 2
print(sv2.norm(3)) # p = 3
print(sv3)
Math operations
# For sparse vectors we need to convert to dense vectors in order to perform math operations as follows:
v = Vectors2.dense(Vectors2.sparse(2, [0,1], [1.0, 2.0]).toArray())
u = Vectors2.dense(Vectors2.sparse(2, [0,1], [3.0, 4.0]).toArray())


# With dense vectors
v = Vectors2.dense([1.0, 2.0])
u = Vectors2.dense([3.0, 4.0])

print(v + u)
print(2 - v)
print(v / 2)
print(v * u)
print(u / v)
print(u % 2)
print(-v)
print(0-v)

Local matrix
A local matrix has integer-typed row and column indices and double-typed values, stored on a single machine. For example, the following dense matrix
is stored in a one-dimensional array [1.0, 3.0, 5.0, 2.0, 4.0, 6.0] with the matrix size (3, 2).
from pyspark.mllib.linalg import Matrices as Matrices1
from pyspark.ml.linalg import Matrices as Matrices2

# Create a dense matrix ((1.0, 2.0), (3.0, 4.0), (5.0, 6.0))
dm2 = Matrices1.dense(3, 2, [1, 3, 5, 2, 4, 6])
dm3 = Matrices2.dense(3, 2, [1, 3, 5, 2, 4, 6])

# Create a sparse matrix ((9.0, 0.0), (0.0, 8.0), (0.0, 6.0))
sm2 = Matrices1.sparse(3, 2, [0, 1, 3], [0, 2, 1], [9, 6, 8])
sm3 = Matrices2.sparse(3, 2, [0, 1, 3], [0, 2, 1], [9, 6, 8])
Distributed matrix
A distributed matrix has long-typed row and column indices and double-typed values, stored distributively in one or more RDDs. It is very important to choose the right format to store large and distributed matrices. Converting a distributed matrix to a different format may require a global shuffle, which is quite expensive. Four types of distributed matrices have been implemented so far.
The basic type is called RowMatrix. A RowMatrix is a row-oriented distributed matrix without meaningful row indices, e.g., a collection of feature vectors. It is backed by an RDD of its rows, where each row is a local vector. We assume that the number of columns is not huge for a RowMatrix so that a single local vector can be reasonably communicated to the driver and can also be stored / operated on a single node. An IndexedRowMatrix is similar to a RowMatrix but with row indices, which can be used for identifying rows and executing joins. A CoordinateMatrix is a distributed matrix stored in coordinate list (COO) format, backed by an RDD of its entries. A BlockMatrix is a distributed matrix backed by an RDD of MatrixBlock which is a tuple of (Int, Int, Matrix).

RowMatrix [RDD-based]
A RowMatrix is a row-oriented distributed matrix without meaningful row indices, backed by an RDD of its rows, where each row is a local vector. Since each row is represented by a local vector, the number of columns is limited by the integer range but it should be much smaller in practice.
from pyspark.mllib.linalg.distributed import RowMatrix

# Create an RDD of vectors.
rows = sc.parallelize([[1, 2, 3], [4, 5, 6], [7, 8, 9], [10, 11, 12]])

# Create a RowMatrix from an RDD of vectors.
mat = RowMatrix(rows)

# Get its size.
m = mat.numRows()  # 4
n = mat.numCols()  # 3

# Get the rows as an RDD of vectors again.
rowsRDD = mat.rows
IndexedRowMatrix [RDD-based]
An IndexedRowMatrix is similar to a RowMatrix but with meaningful row indices. It is backed by an RDD of indexed rows, so that each row is represented by its index (long-typed) and a local vector.
from pyspark.mllib.linalg.distributed import IndexedRow, IndexedRowMatrix

# Create an RDD of vectors.
rows = sc.parallelize([IndexedRow(0,[1, 2, 3]),
                       IndexedRow(1,[4, 5, 6]),
                       IndexedRow(2,[7, 8, 9]),
                       IndexedRow(3,[10, 11, 12])])

# Create a RowMatrix from an RDD of vectors.
mat = IndexedRowMatrix(rows)

# Get its size.
m = mat.numRows()  # 4
n = mat.numCols()  # 3

# Get the rows as an RDD of vectors again.
rowsRDD = mat.rows
CoordinateMatrix [RDD-based]
A CoordinateMatrix is a distributed matrix backed by an RDD of its entries. Each entry is a tuple of (i: Long, j: Long, value: Double), where i is the row index, j is the column index, and value is the entry value. A CoordinateMatrix should be used only when both dimensions of the matrix are huge and the matrix is very sparse.
from pyspark.mllib.linalg.distributed import CoordinateMatrix, MatrixEntry

# Create an RDD of coordinate entries.
#   - This can be done explicitly with the MatrixEntry class:
entries = sc.parallelize([MatrixEntry(0, 0, 1.2), MatrixEntry(1, 0, 2.1), MatrixEntry(2, 1, 3.7)])
#   - or using (long, long, float) tuples:
entries = sc.parallelize([(0, 0, 1.2), (1, 0, 2.1), (2, 1, 3.7)])

# Create a CoordinateMatrix from an RDD of MatrixEntries.
mat = CoordinateMatrix(entries)

# Get its size.
m = mat.numRows()  # 3
n = mat.numCols()  # 2

# Get the entries as an RDD of MatrixEntries.
entriesRDD = mat.entries

# Convert to a RowMatrix.
rowMat = mat.toRowMatrix()

# Convert to an IndexedRowMatrix.
indexedRowMat = mat.toIndexedRowMatrix()

# Convert to a BlockMatrix.
blockMat = mat.toBlockMatrix()
BlockMatrix [RDD-based]
A BlockMatrix is a distributed matrix backed by an RDD of MatrixBlocks, where a MatrixBlock is a tuple of ((Int, Int), Matrix), where the (Int, Int) is the index of the block, and Matrix is the sub-matrix at the given index with size rowsPerBlock x colsPerBlock. BlockMatrix supports methods such as add and multiply with another BlockMatrix. BlockMatrix also has a helper function validate which can be used to check whether the BlockMatrix is set up properly.
from pyspark.mllib.linalg import Matrices
from pyspark.mllib.linalg.distributed import BlockMatrix

# Create an RDD of sub-matrix blocks.
blocks = sc.parallelize([((0, 0), Matrices.dense(3, 2, [1, 2, 3, 4, 5, 6])),
                         ((1, 0), Matrices.dense(3, 2, [7, 8, 9, 10, 11, 12]))])

# Create a BlockMatrix from an RDD of sub-matrix blocks.
mat = BlockMatrix(blocks, 3, 2)

# Get its size.
m = mat.numRows()  # 6
n = mat.numCols()  # 2

# Get the blocks as an RDD of sub-matrix blocks.
blocksRDD = mat.blocks

# Convert to a LocalMatrix.
localMat = mat.toLocalMatrix()

# Convert to an IndexedRowMatrix.
indexedRowMat = mat.toIndexedRowMatrix()

# Convert to a CoordinateMatrix.
coordinateMat = mat.toCoordinateMatrix()
We recommend to use local vectors and store them in distributed dataframes. Feel free to use distributed matrices if needed but avoid using local matrices which operate only on a single machine.
Compressed Sparse Matrices in pyspark.ml.linalg
Sparse Matrix stored in CSC format.

Adjacent pairs of index pointers determine two things. First, their position in the pointer array is the row number. Second, these values represent the [start:stop] slice of the indices array, and their difference is the NNZ elements in each row. Using the pointers, look up the indices to determine the column for each element in the data.
from pyspark.ml.linalg import SparseMatrix, DenseMatrix, Matrices

mat = SparseMatrix(7, 5, [0,1,1,4,6,7], [0,0,1,4,4,6,4],[8,2,5,7,1,9,2])

rows = mat.numRows
cols = mat.numCols

numpyArray = mat.toArray()

denseMat = mat.toDense()
Feature Extraction
For most ML pipelines, feature extraction is one of the first stages to do. The need to extract features from the data has multiple advantages. One of them is to reduce the dimensionality of the data, and also to increase the performance of ML models.
Pipeline
A simple pipeline, which acts as an estimator. A Pipeline consists of a sequence of stages, each of which is either an Estimator or a Transformer. When Pipeline.fit() is called, the stages are executed in order. If a stage is an Estimator, its Estimator.fit() method will be called on the input dataset to fit a model. Then the model, which is a transformer, will be used to transform the dataset as the input to the next stage. If a stage is a Transformer, its Transformer.transform() method will be called to produce the dataset for the next stage. The fitted model from a Pipeline is a PipelineModel, which consists of fitted models and transformers, corresponding to the pipeline stages. If stages is an empty list, the pipeline acts as an identity transformer.
Example on TF-IDF
Term frequency-inverse document frequency (TF-IDF) is a feature vectorization method widely used in text mining to reflect the importance of a term to a document in the corpus. It is give by the following formula:
Example:
We have two documents:
- “Python python Spark Spark”
- “Python SQL”
Then,
So is:
- Import packages
import pandas as pd
import numpy as np
from pyspark.sql import SparkSession
- Create session and get SparkContext
spark = SparkSession \
        .builder \
        .appName("my spark app") \
        .master("yarn") \
        .getOrCreate()
sc = spark.sparkContex
- Test on the previous example.
Count Vectorizer: is a popular alogoritm used to generate term frequency vectors. It basically convert documents into a numerical representation which can be fed directly or with further processing into other algorithms like LDA (topic modeling).
from pyspark.ml import Pipeline
from pyspark.ml.feature import CountVectorizer, HashingTF, IDF, Tokenizer, StopWordsRemover

# Create dataframe to hold the sentences
sentenceData = spark.createDataFrame([
    (0, "Python python Spark Spark"),
    (1, "Python SQL")],
    ["document", "sentence"]
)

# Tokenization
tokenizer = Tokenizer(inputCol="sentence", outputCol="words")

# Count vectorizer
vectorizer = CountVectorizer(inputCol="words", outputCol="rawFeatures")

# HashingTF
# vectorizer = HashingTF(inputCol="words", outputCol="rawFeatures")

# TF-IDF
idf = IDF(inputCol="rawFeatures", outputCol="features")
pipeline = Pipeline(stages=[tokenizer, vectorizer, idf])

# Fit the pipeline
model = pipeline.fit(sentenceData)

# Calculate the total count of each term in all documents
total_counts = model.transform(sentenceData)\
.select('rawFeatures').rdd\
.map(lambda row: row['rawFeatures'].toArray())\
.reduce(lambda x,y: [x[i]+y[i] for i in range(len(y))])


# Return the vocabulary of CountVectorizer
vocabList = model.stages[1].vocabulary

# Create dict with total counts for the terms
d = {'vocabList':vocabList,'counts':total_counts}

# Can show it as a dataframe
spark.createDataFrame(np.array(list(d.values())).T.tolist(),list(d.keys())).show()

# Output of CountVectorizer
counts = model.transform(sentenceData).select('rawFeatures').collect()


# Return the TF-IDF in column `features`
model.transform(sentenceData).show(truncate=False)
- Retrieve the terms from indices
from pyspark.sql.types import ArrayType, StringType, DoubleType, IntegerType
import pyspark.sql.functions as F

# Get output of Count Vectorizer
rawFeatures = model.transform(sentenceData).select('rawFeatures')

# show the dataframe
rawFeatures.show()

# Create a function for the conversion
def termsIdx2Term(vocabulary):
    def termsIdx2Term(termIndices):
        return [vocabulary[int(index)] for index in termIndices]
    return F.udf(termsIdx2Term, ArrayType(StringType()))


# register the UDFs
indices_udf = F.udf(lambda vector: vector.indices.tolist(), ArrayType(IntegerType()))

values_udf = F.udf(lambda vector: vector.toArray().tolist(), ArrayType(DoubleType()))


# Apply the UDFs
temp = rawFeatures.withColumn('indices',indices_udf(F.col('rawFeatures')))\
    .withColumn('values', values_udf(F.col('rawFeatures')))\
    .withColumn("Terms", termsIdx2Term(vocabList)("indices"))

# show the result
temp.show()
- Test on a larger dataset. Upload
HollywoodMovies.csvto HDFS. - Read from HDFS
# %pyspark
#
path = "HollywoodMovies.csv" # HDFS
df = spark.read.load(path, format="csv", sep = ",", inferSchema = "true", header = "true")

df.show()
- Select
moviescolumn
filmsdf = df.select("Movie")
filmsdf.show(truncate=False)
- Build the pipeline
from pyspark.ml import Pipeline
from pyspark.ml.feature import CountVectorizer, HashingTF, IDF, Tokenizer, StopWordsRemover

# Tokenize the movie titles
tokenizer = Tokenizer(inputCol="Movie", outputCol="words")

# Remove the stop words
swremoval = StopWordsRemover(inputCol="words", outputCol="stremoved")

# Tokenize the movie titles
vectorizer = CountVectorizer(inputCol="stremoved", outputCol="rawFeatures")
idf = IDF(inputCol="rawFeatures", outputCol="features")
pipeline = Pipeline(stages = [tokenizer, swremoval, vectorizer, idf])

model = pipeline.fit(filmsdf)

model.write().overwrite().save("models/tfidfmodel")

model
HashingTF is also an algorithm used to generate the term frequency vectors but with some differences. HashingTF is irreversible and it is a dimensionality reduction algorithm with possible collisions.
- Transform the data
films = model.transform(filmsdf)

# Show first ten transformed features of films
films.show(10)

# Show first ten values of column `words`
films.select('words').show(10, truncate = False)

# Show first ten values of column `stremoved`
films.select('stremoved').show(10, truncate = False)

# Show first ten values of column `rawFeatures`
films.select('rawFeatures').show(10, truncate = False)

# Get the real values of the Spark DataFrame
films.select('rawFeatures').rdd.flatMap(lambda x : x).map(lambda x : x.toArray()).collect()
- Get the total counts for each column
# Getting the total count for each term

total_counts = model.transform(filmsdf) \
    .select('rawFeatures').rdd \
    .map(lambda row: row['rawFeatures'].toArray()) \
    .reduce(lambda x,y: [x[i]+y[i] for i in range(len(y))])
total_counts
- Get the vocabulary along with count
# Get the vocabulary along with the counts

vocabList = model.stages[2].vocabulary
d = {'vocabList':vocabList,'counts':total_counts}

spark.createDataFrame(np.array(list(d.values())).T.tolist(),list(d.keys())).show()
- Get the vectorized and raw representation of the movies data
from pyspark.sql.types import ArrayType, StringType

def termsIdx2Term(vocabulary):
    def termsIdx2Term(termIndices):
        return [vocabulary[int(index)] for index in termIndices]
    return udf(termsIdx2Term, ArrayType(StringType()))

vectorizerModel = model.stages[2]
vocabList = vectorizerModel.vocabulary
print(vocabList)

rawFeatures = model.transform(filmsdf).select('rawFeatures')

from pyspark.sql.functions import udf
import pyspark.sql.functions as F
from pyspark.sql.types import StringType, DoubleType, IntegerType
indices_udf = udf(lambda vector: vector.indices.tolist(), ArrayType(IntegerType()))
values_udf = udf(lambda vector: vector.toArray().tolist(), ArrayType(DoubleType()))
rawFeatures.withColumn('indices', indices_udf(F.col('rawFeatures'))) \
    .withColumn('values', values_udf(F.col('rawFeatures'))) \
    .withColumn("Terms", termsIdx2Term(vocabList)("indices")).show()
Linear Regression
We will predict the AudienceScore from Movie, LeadStudio and RottenTomatoes columns using Linear Regression from Spark MLlib.
StringIndexer
A label indexer that maps a string column of labels to an ML column of label indices. If the input column is numeric, we cast it to string and index the string values. The indices are in [0, numLabels). By default, this is ordered by label frequencies so the most frequent label gets index 0.
OneHotEncoder
A one-hot encoder that maps a column of category indices to a column of binary vectors, with at most a single one-value per row that indicates the input category index. For example with 5 categories, an input value of 2.0 would map to an output vector of [0.0, 0.0, 1.0, 0.0]. The last category is not included by default (configurable via dropLast), because it makes the vector entries sum up to one, and hence linearly dependent. So an input value of 4.0 maps to [0.0, 0.0, 0.0, 0.0].
VectorAssembler
A feature transformer that merges multiple columns into a vector column.
VectorIndexer
Class for indexing categorical feature columns in a dataset of Vector
This has 2 usage modes:
- Automatically identify categorical features (default behavior)
- This helps process a dataset of unknown vectors into a dataset with some continuous features and some categorical features. The choice between continuous and categorical is based upon a maxCategories parameter
- Set maxCategories to the maximum number of categorical any categorical feature should have.
- E.g.: Feature 0 has unique values {-1.0, 0.0}, and feature 1 values {1.0, 3.0, 5.0}. If maxCategories = 2, then feature 0 will be declared categorical and use indices {0, 1}, and feature 1 will be declared continuous.
- Index all features, if all features are categorical
- If maxCategories is set to be very large, then this will build an index of unique values for all features.
- Warning: This can cause problems if features are continuous since this will collect ALL unique values to the driver.
- E.g.: Feature 0 has unique values {-1.0, 0.0}, and feature 1 values {1.0, 3.0, 5.0}. If maxCategories >= 3, then both features will be declared categorical.
# Select some features with the label
dfvec = df.select(["Movie", "LeadStudio",  "RottenTomatoes", "AudienceScore"])

# Rename the label column
dfvec = dfvec.withColumnRenamed("AudienceScore","label")

# Separate the categorical features from numerical ones
categoricalCols = ['Movie', 'LeadStudio']
others = [c for c in dfvec.columns if c not in categoricalCols]

# Drop the label from the features list
others.remove("label")

from pyspark.ml import Pipeline
from pyspark.ml.feature import StringIndexer, OneHotEncoder, VectorAssembler
from pyspark.sql.functions import col

# Create String indexer to assign index for the string fields where each unique string will get a unique index
# String Indexer is required as an input for One-Hot Encoder
# We set the case as `skip` for any string out of the input strings
indexers = [ StringIndexer(inputCol=c, outputCol="{0}_indexed".format(c)).setHandleInvalid("skip") for c in categoricalCols ]

# Encode the strings using One Hot encoding
# default setting: dropLast=True ==> For example with 5 categories, an input value of 2.0 would map to an output vector of [0.0, 0.0, 1.0, 0.0]. The last category is not included by default (configurable via dropLast), because it makes the vector entries sum up to one, and hence linearly dependent. So an input value of 4.0 maps to [0.0, 0.0, 0.0, 0.0].
encoders = [ OneHotEncoder(inputCol=indexer.getOutputCol(), outputCol="{0}_encoded".format(indexer.getOutputCol())) for indexer in indexers ]

# This will concatenate the input cols into a single column.
assembler = VectorAssembler(inputCols=[encoder.getOutputCol() for encoder in encoders] + others, outputCol= "features")

# You can create a pipeline to use only a single fit and transform on the data.
pipeline = Pipeline(stages=indexers + encoders + [assembler])

# Drop null values for any row contain NULL in any column
dfvec = dfvec.na.drop()

# Fit the pipeline ==> This will call the fit functions for all transformers if exist
model=pipeline.fit(dfvec)
# Fit the pipeline ==> This will call the transform functions for all transformers
data = model.transform(dfvec)

# We delete all features and keep only the features and label columns
data = data.select(["features", "label"])


from pyspark.ml.regression import LinearRegression
from pyspark.ml.feature import VectorIndexer
from pyspark.ml.evaluation import RegressionEvaluator

# Automatically identify categorical features, and index them.
# We specify maxCategories so features with > 4
# distinct values are treated as continuous.
featureIndexer = VectorIndexer(inputCol="features", outputCol="indexedFeatures", maxCategories=4).fit(data)
transformed = featureIndexer.transform(data)

# Display the output Spark DataFrame
transformed.show()


#  split the data into 60% training and 40% test (it is not stratified)
(trainingData, testData) = transformed.randomSplit([0.6, 0.4])

# Create Linear Regression Model
lr = LinearRegression()

# Add the last indexer with the model to the pipeline
pipeline = Pipeline(stages=[featureIndexer, lr])

# Fit the data to the pipeline stages
model = pipeline.fit(trainingData)

# Transform the data (Prediction)
predictions = model.transform(testData)

# Display the predictions
predictions.show()

from pyspark.ml.evaluation import RegressionEvaluator

# Evaluate the performance of the model
evaluator = RegressionEvaluator(labelCol="label", predictionCol="prediction", metricName="rmse")
rmse = evaluator.evaluate(predictions)
print("Root Mean Squared Error (RMSE) on test data = {}".format(rmse))
Classification
Here we will build a decision tree classifier and train it to predict the result for the home team (WIN, LOSE, DRAW).
Data Description
This dataset includes results of international football matches starting from the very first official match in up to . The matches range from FIFA World Cup to FIFI Wild Cup to regular friendly matches. The matches are strictly men’s full internationals and the data does not include Olympic Games or matches where at least one of the teams was the nation’s B-team, U-23 or a league select team.
results.csv includes the following columns:
- date - date of the match
- home_team - the name of the home team
- away_team - the name of the away team
- home_score - full-time home team score including extra time, not including penalty-shootouts
- away_score - full-time away team score including extra time, not including penalty-shootouts
- tournament - the name of the tournament
- city - the name of the city/town/administrative unit where the match was played
- country - the name of the country where the match was played
- neutral - TRUE/FALSE column indicating whether the match was played at a neutral venue
You can download the dataset from here. For the dataset of scorers and shootouts you can check this Kaggle data card.
Read the data
from pyspark.sql.types import StructType, StructField, IntegerType, StringType, BooleanType, DateType

# define a schema for the dataframe
schema = StructType([
    StructField("date", DateType(), nullable=False),
    StructField("home_team", StringType(), nullable=False),
    StructField("away_team", StringType(), nullable=False),
    StructField("home_score", IntegerType(), False),
    StructField("away_score", IntegerType(), False),
    StructField("tournament", StringType(), False),
    StructField("city", StringType(), False),
    StructField("country", StringType(), False),
    StructField("neutral", BooleanType(), False),
])

#read data
df = spark.read.format("csv").load("results.csv", header = True, schema = schema)

df
We observe that nullable constraint is not preserved according to the defined schema and this result is related to a bug. We still can remove the nulls using dropna() in pyspark.sql.DataFrame.
# away_score has some null values

df.filter("away_score is NULL")


# drop all records which contain nulls
df = df.na.drop()
df
Feature extraction
from pyspark.ml.feature import OneHotEncoder, StringIndexer, VectorAssembler, RobustScaler, MinMaxScaler
from pyspark.ml import Pipeline
from pyspark.sql import functions as F

# Encoding the Labels of the boolean feature
df = df.withColumn('neutral', F.col('neutral').cast('integer'))

#
df = df.withColumn('home_result',
                   F.when(F.col('home_score') > F.col('away_score'), 'WIN')
                   .when(F.col('home_score') < F.col('away_score'),'LOSE')
                   .otherwise('DRAW')
                   )

# non-numerical features 'tournament',
features = ['away_team', 'home_team', 'city', 'country']

indexer = StringIndexer()
indexer.setInputCols(features)
features_idx = list(map(lambda x : x + "_idx", features))
indexer.setOutputCols(features_idx)

encoders = []
for f in features_idx:
  encoders.append(OneHotEncoder(inputCol = f, outputCol=f + "_enc"))


# # We excluded date field
# # Scale the columns 'home_score' and 'away_score'
score_assembler = VectorAssembler(
    inputCols = ['home_score', 'away_score'],
    outputCol='score'
    )


final_assembler = VectorAssembler(inputCols = ['score'] + list(map(lambda x : x + "_enc", features_idx)), outputCol = "features_unscaled")

scaler = MinMaxScaler(inputCol = "features_unscaled", outputCol = "features")

pipeline = Pipeline(stages = [indexer] + encoders + [score_assembler, final_assembler, scaler])


features_pipeline_model = pipeline.fit(df)

# We need to save it for decoding these features later
features_pipeline_model.write().overwrite().save("features_pipeline_model")

df_enc = features_pipeline_model.transform(df)


# Encode labels
label = 'home_result'

# index the labels
indexer = StringIndexer()
indexer.setInputCol(label)
indexer.setOutputCol('label')
label_idx_model = indexer.fit(df_enc)

# Save indexer model
label_idx_model.write().overwrite().save("label_idx_model")

# Apply the indexer
df_labeled = label_idx_model.transform(df_enc)

df_proj = df_labeled.select('features', 'label')
df_proj


df_in = df_proj

# check number of distinct classes
print("We have {} classes".format(df_in.select('label').distinct().count()))
Sampling
# This split is not stratified
# We do not have a stratified feature for split operation
# Can you build a stratified train-test split? :)

trainRatio = 0.8

train_df, test_df = df_in.randomSplit([trainRatio, 1 - trainRatio], seed = 9)

train_df.count(), test_df.count()
Fit the classifier
from pyspark.ml.classification import DecisionTreeClassifier, LinearSVC

# Fit and transform

classifier = DecisionTreeClassifier()

model = classifier.fit(train_df)
model.write().overwrite().save("spark_ml_model")

model
Prediction
# predictions = model.transform(train_df)
# predictions

predictions = model.transform(test_df)
predictions
Evaluation
# Evaluate using pyspark.ml.evaluation.MulticlassClassificationEvaluator
from pyspark.ml.evaluation import MulticlassClassificationEvaluator

evaluator = MulticlassClassificationEvaluator()\
  .setLabelCol("label")\
  .setPredictionCol("prediction")\
  .setMetricName("f1")

# Check here more metrics
# https://spark.apache.org/docs/latest/api/python/reference/api/pyspark.ml.evaluation.MulticlassClassificationEvaluator.html#pyspark.ml.evaluation.MulticlassClassificationEvaluator.metricName

f1 = evaluator.evaluate(predictions)


f1
Hyper-parameter tuning & Cross validation
# Hyper-parameter tuning using Cross Validation

from pyspark.ml.tuning import ParamGridBuilder, CrossValidator

grid = ParamGridBuilder()
grid = grid.addGrid(model.maxDepth, [5, 7, 10]).build()

cv = CrossValidator(estimator = classifier,
                    estimatorParamMaps = grid,
                    evaluator = evaluator,
                    parallelism = 5,
                    numFolds=3)

cvModel = cv.fit(train_df)
bestModel = cvModel.bestModel
bestModel
prediction
predictions = bestModel.transform(test_df)
predictions
Evaluation
# Evaluate using pyspark.ml.evaluation.MulticlassClassificationEvaluator
from pyspark.ml.evaluation import MulticlassClassificationEvaluator

evaluator = MulticlassClassificationEvaluator()\
  .setLabelCol("label")\
  .setPredictionCol("prediction")\
  .setMetricName("f1")

# Check here more metrics
# https://spark.apache.org/docs/latest/api/python/reference/api/pyspark.ml.evaluation.MulticlassClassificationEvaluator.html#pyspark.ml.evaluation.MulticlassClassificationEvaluator.metricName

f1 = evaluator.evaluate(predictions)


f1
You can continue learning classification, clustering, other ML models from the book.