Lab 0 - Docker & Bash
Course: Big Data - IU
Agenda
- Lab 0 - Docker & Bash
- Agenda
- Docker
- How is Docker different from VMs?
- Check Docker Info
- Test Docker installation
- Build Your Image and Instantiate Your Container
- Repository for Docker Images
- Docker for Services
- More About Swarms
- More About Stacks
- Afterword
- Links
- Docker Tutorial: Troubleshooting
- I have installed Docker Toolbox, but starting script fails
- Docker Toolbox cannot download boot2docker.iso image
- docker-machine does not see Virtual box
- Command eval $(sudo docker-machine env myvm1) does not do what I want
- docker-machine does not work without sudo
- After shutting down workers, cannot use swarm, it says that certificate has expired
- docker-machine complains on lack of virtualization support
- docker-machine does not work on mac
- Containers stuck in Ready state
- Self-check Questions
- Acceptance criteria:
- Bash
Docker
This tutorial guides you through creating your first Docker container. It was heavily drawn from the official Docker Getting Started Guide.
This tutorial comes with a troubleshooting section that lists the most common problems.
How is Docker different from VMs?
Virtual Machine emulates a fully working isolated OS. It requires the same resources from the host as a normal OS would, meaning it would load its kernel into the memory, load all necessary kernel modules, all the libraries to work with the software and only then will allocate resources for a user application. If you run 100 identical VMs, they would occupy 100 times more resources.
A Docker container, on the other hand, runs natively on Linux and shares the kernel of the host machine with other containers. It runs a discrete process, taking no more memory than any other executable, making it lightweight.
The difference can be intuitively demonstrated by the following image
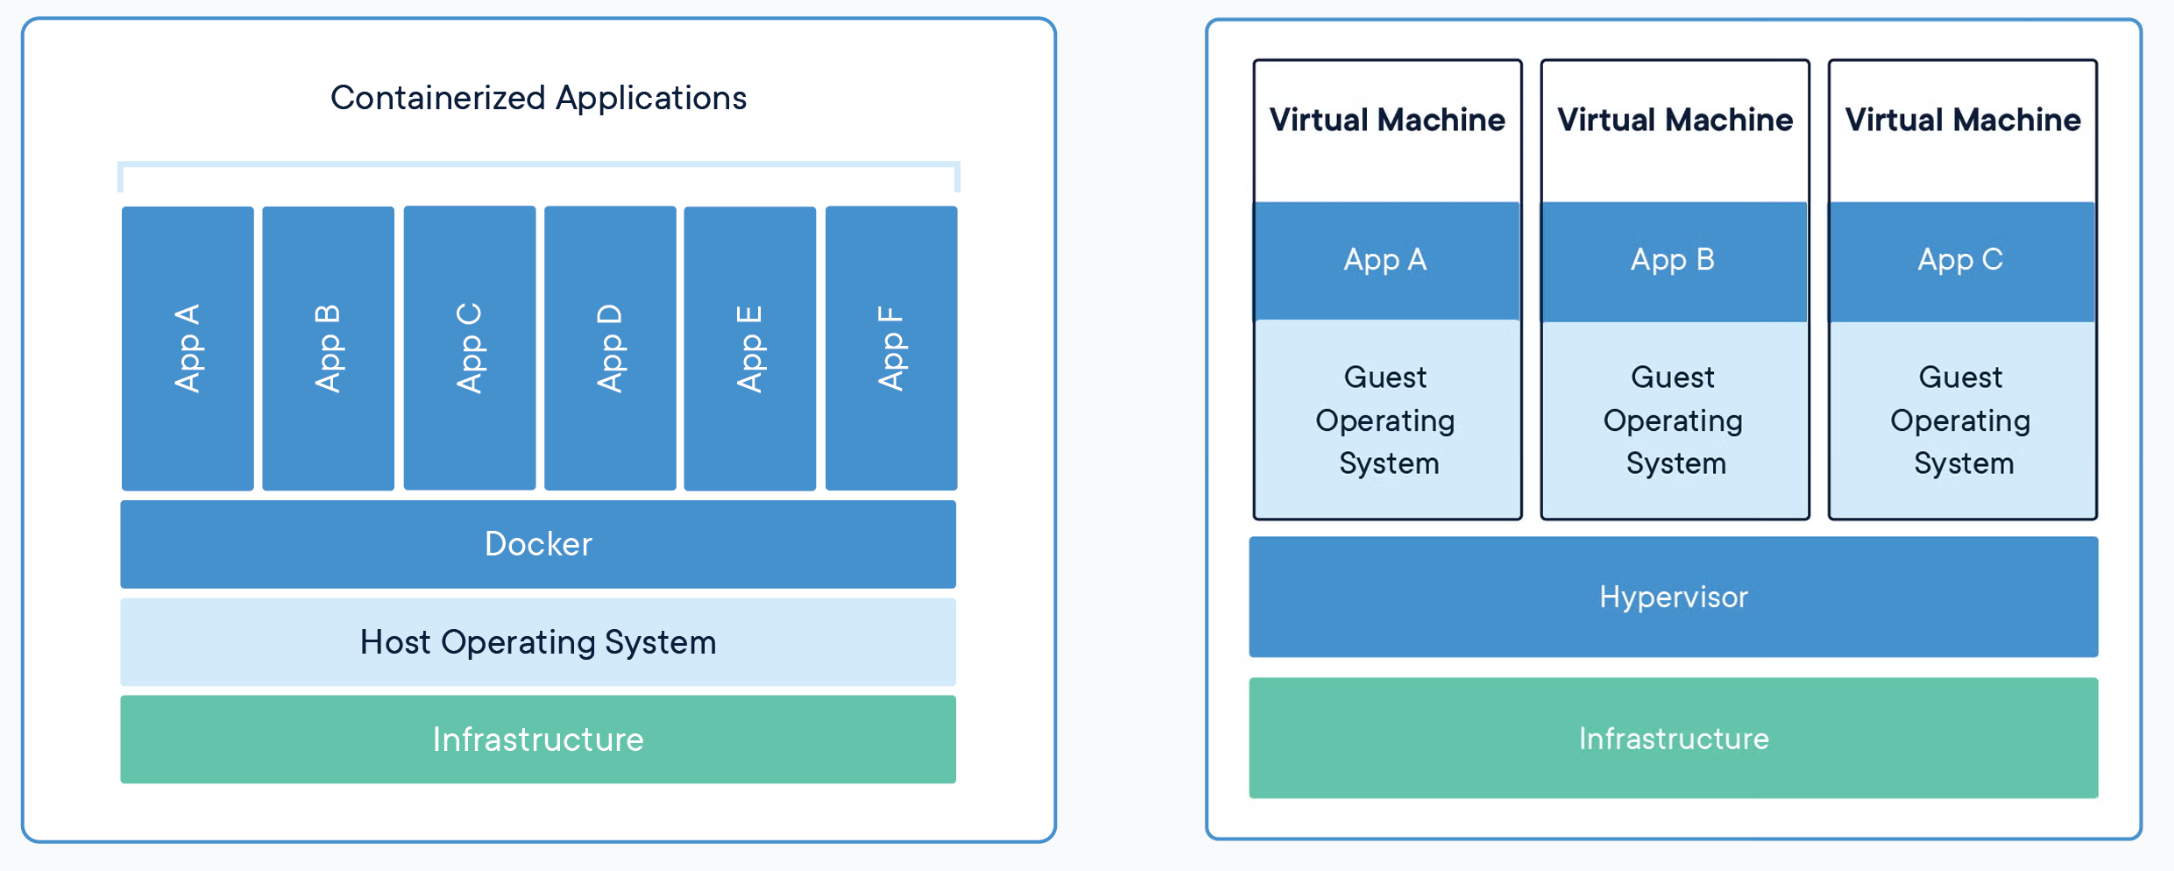
Source: Docker: Get Started
Follow official guidelines to install docker. Mac and Windows users should install Docker Desktop. Linux users should follow instructions for servers.
Linux users should complete istructions to manage Docker as non-root user post-installation instructions.
Check Docker Info
We assume you have already installed Docker on your OS. Open your favorite terminal emulator and try running
docker --version && docker info
Test Docker installation
Avoid using Docker in the form of snap container. People reported multiple issues with this type of installation.
16/09/2019
Test that your installation works by running the simple Docker image, hello-world:
docker run hello-world
List local images and find hello-world that was downloaded to your machine:
docker image ls
List the hello-world container (spawned by the image) which exits after displaying its message. If it were still running, you would not need the --all option:
docker container ls --all

CONTAINER ID     IMAGE           COMMAND      CREATED            STATUS
54f4984ed6a8     hello-world     "/hello"     20 seconds ago     Exited (0)
A container is launched by running an image. An image is an executable package that includes everything needed to run an application – code, runtime, libraries, environment variables, and configuration files.
A container is a runtime instance of an image – what the image becomes in memory when executed (that is, an image with state, or a user process). You can see a list of your running containers with the command, docker ps, just as you would in Linux.
Build Your Image and Instantiate Your Container
Dockerfile defines what goes on in the environment inside your container. Access to resources like networking interfaces and disk drives is virtualized inside this environment, which is isolated from the rest of your system, so you need to map ports to the outside world, and be specific about what files you want to “copy in” to that environment. However, after doing that, you can expect that the build of your app defined in this Dockerfile behaves exactly the same wherever it runs.
Before Building an Image
Create Dockerfile (simple text document, no extension) with the the following content
# Use an official Python runtime as a parent image
FROM python:2.7-slim

# Set the working directory to /app
WORKDIR /app

# Copy the current directory contents into the container at /app
COPY . /app

# Install any needed packages specified in requirements.txt
RUN pip install --trusted-host pypi.python.org -r requirements.txt

# Make port 80 available to the world outside this container
EXPOSE 80

# Define environment variable
ENV NAME World

# Run app.py when the container launches
CMD ["python", "app.py"]
Try to understand what this file defines. This Dockerfile refers to a couple of files we haven’t created yet, namely app.py and requirements.txt. Create them and put them in the same folder with the Dockerfile.
Create requirements.txt with the following content
Flask
Redis
and app.py
from flask import Flask
from redis import Redis, RedisError
import os
import socket

# Connect to Redis
redis = Redis(host="redis", db=0, socket_connect_timeout=2, socket_timeout=2)

app = Flask(__name__)

@app.route("/")
def hello():
    try:
        visits = redis.incr("counter")
    except RedisError:
        visits = "<i>cannot connect to Redis, counter disabled</i>"

    html = "<h3>Hello {name}!</h3>" \
           "<b>Hostname:</b> {hostname}<br/>" \
           "<b>Visits:</b> {visits}"
    return html.format(name=os.getenv("NAME", "world"), hostname=socket.gethostname(), visits=visits)

if __name__ == "__main__":
    app.run(host='0.0.0.0', port=80)
Build the App
We are ready to build the app. Make sure you are still at the top level of your new directory. Here’s what ls should show:
$ ls

Dockerfile		app.py			requirements.txt
Now run the build command. This creates a Docker image, which we’re going to name using the --tag option. Use -t if you want to use the shorter option.
docker build --tag=friendlyhello .
The image is placed into Docker’s local image registry:
$ docker image ls

REPOSITORY            TAG                 IMAGE ID
friendlyhello         latest              326387cea398
Note how the tag defaulted to latest. The full syntax for the tag option would be something like --tag=friendlyhello:v0.0.1.
Run the app
Run the app, mapping your machine’s port 4000 to the container’s published port 80 using -p:
docker run -p 4000:80 friendlyhello
If you are unsure what a port is, we have some additional homework for you :)
You should see a message that Python is serving your app at http://0.0.0.0:80. But that message is coming from inside the container, which doesn’t know you mapped port 80 of that container to 4000, making the correct URL http://localhost:4000.
Go to that URL in a web browser to see the display content served up on a web page. You can stop the web server by hitting CRTL+C in your terminal.
Now let’s run the app in the background, in detached mode:
docker run -d -p 4000:80 friendlyhello
You will get a container ID in return. You can check available containers with docker container ls. Use the ID to stop the container:
docker container stop ID
Repository for Docker Images
Try uploading your image to Docker repository. The following commands are self sufficient.
docker login             # Log in this CLI session using your Docker credentials
docker tag <image> username/repository:tag  # Tag <image> for upload to registry
docker push username/repository:tag            # Upload tagged image to registry
docker run username/repository:tag                   # Run image from a registry
Docker for Services
In a distributed application, different pieces of the app are called “services”. For example, if you imagine a video sharing site, it probably includes a service for storing application data in a database, a service for video transcoding in the background after a user uploads something, a service for the front-end, and so on.
Services are really just “containers in production.” A service only runs one image, but it codifies the way that image runs — what ports it should use, how many replicas of the container should run so the service has the capacity it needs, and so on. Scaling a service changes the number of container instances running that piece of software, assigning more computing resources to the service in the process. And containers help to create a controlled environment for software execution.
First, verify that you have docker-compose installed
docker-compose --version
If not, read how to install Docker Compose on your system.
Define a Service
With Docker it is easy to define, run, and scale services – just write a docker-compose.yml file
version: "3"
services:
  web:
    # replace username/repo:tag with your name and image details
    image: username/repo:tag
    deploy:
      replicas: 5
      resources:
        limits:
          cpus: "0.1"
          memory: 50M
      restart_policy:
        condition: on-failure
    ports:
      - "4000:80"
    networks:
      - webnet
networks:
  webnet:
This docker-compose.yml file tells Docker to do the following:
-
Pull the image we uploaded before from the registry
-
Run 5 instances of that image as a service called web, limiting each one to use, at most, 10% of a single core of CPU time (this could also be e.g. “1.5” to mean 1 and half core for each), and 50MB of RAM
-
Immediately restart containers if one fails
-
Map port 4000 on the host to web’s port 80
-
Instruct web’s containers to share port 80 via a load-balanced network called
webnet. (Internally, the containers themselves publish to web’s port 80 at an ephemeral port) -
Define the webnet network with the default settings (which is a load-balanced overlay network)
Deploying a Service
Initialize Docker swarm:
docker swarm init
Now let’s run it. You need to give your app a name. Here, it is set to getstartedlab:
docker stack deploy -c docker-compose.yml getstartedlab
You can list running services with docker service ls . A single container running in a service is called a task. Tasks are given unique IDs that numerically increment, up to the number of replicas you defined in docker-compose.yml. List the tasks for your service:
docker service ps getstartedlab_web
Alternatively, you can list your running containers docker container ls -q.
You can run curl -4 http://localhost:4000 several times in a row, or go to that URL in your browser and hit refresh a few times.
Scaling Your App
You can scale the app by changing the replicas value in docker-compose.yml, saving the change, and re-running the docker stack deploy command:
docker stack deploy -c docker-compose.yml getstartedlab
Docker performs an in-place update, no need to tear the stack down first or kill any containers.
Now, re-run docker container ls -q to see the deployed instances reconfigured. If you scaled up the replicas, more tasks, and hence, more containers, are started.
Shutting Down Your Service
Take the app down with docker stack rm:
docker stack rm getstartedlab
Take down the swarm.
docker swarm leave --force
More About Swarms
Make sure you have docker-machine installed
docker-machine --version
If not, follow the instructions for your OS here.
Set Up Your Swarm
A swarm is made up of multiple nodes, which can be either physical or virtual machines. The basic concept is simple enough: run docker swarm init to enable swarm mode and make your current machine a swarm manager, then run docker swarm join on other machines to have them join the swarm as workers. We use VMs to quickly create a two-machine cluster and turn it into a swarm.
Create a couple of VMs using docker-machine, using the VirtualBox driver:
docker-machine create --driver virtualbox myvm1
docker-machine create --driver virtualbox myvm2
Alternatively, you can use a real servers or other VMs that have Docker installed. You can read more about docker-machine in the official documentation. List VMs and get their IP addresses
docker-machine ls
Now you can initialize the swarm and add nodes. The first machine acts as the manager, which executes management commands and authenticates workers to join the swarm, and the second is a worker.
You can send commands to your VMs using docker-machine ssh. Instruct myvm1 to become a swarm manager with docker swarm init and look for output like this:
$ docker-machine ssh myvm1 "docker swarm init --advertise-addr <myvm1 ip>"
Swarm initialized: current node <node ID> is now a manager.

To add a worker to this swarm, run the following command:

  docker swarm join \
  --token <token> \
  <myvm ip>:<port>

To add a manager to this swarm, run 'docker swarm join-token manager' and follow the instructions.
As you can see, the response to docker swarm init contains a pre-configured docker swarm join command for you to run on any nodes you want to add. Copy this command, and send it to myvm2 via docker-machine ssh to have myvm2 join your new swarm as a worker:
$ docker-machine ssh myvm2 "docker swarm join \
--token <token> \
<ip>:2377"

This node joined a swarm as a worker.
Run docker node ls on the manager to view the nodes in this swarm
Deploy You App to the Swarm Cluster
So far, you’ve been wrapping Docker commands in docker-machine ssh to talk to the VMs. Another option is to run docker-machine env <machine> to get and run a command that configures your current shell to talk to the Docker daemon on the VM. This method works better for the next step because it allows you to use your local docker-compose.yml file to deploy the app “remotely” without having to copy it anywhere.
Type docker-machine env myvm1, then copy-paste and run the command provided as the last line of the output to configure your shell to talk to myvm1, the swarm manager.
$ docker-machine env myvm1
export DOCKER_TLS_VERIFY="1"
export DOCKER_HOST="tcp://192.168.99.100:2376"
export DOCKER_CERT_PATH="/Users/sam/.docker/machine/machines/myvm1"
export DOCKER_MACHINE_NAME="myvm1"
# Run this command to configure your shell:
# eval $(docker-machine env myvm1)
Run the given command to configure your shell to talk to myvm1.
eval $(docker-machine env myvm1)
On Windows it looks differently
PS C:\Users\sam\sandbox\get-started> docker-machine env myvm1
$Env:DOCKER_TLS_VERIFY = "1"
$Env:DOCKER_HOST = "tcp://192.168.203.207:2376"
$Env:DOCKER_CERT_PATH = "C:\Users\sam\.docker\machine\machines\myvm1"
$Env:DOCKER_MACHINE_NAME = "myvm1"
$Env:COMPOSE_CONVERT_WINDOWS_PATHS = "true"
# Run this command to configure your shell:
# & "C:\Program Files\Docker\Docker\Resources\bin\docker-machine.exe" env myvm1 | Invoke-Expression
Run the given command to configure your shell to talk to myvm1.
& "C:\Program Files\Docker\Docker\Resources\bin\docker-machine.exe" env myvm1 | Invoke-Expression
Run docker-machine ls to verify that myvm1 is now the active machine, as indicated by the asterisk next to it.
Deploy the App on the Swarm Manager
Now that you have configured your environment to access myvm1, your swarm manager, you can easily deploy your application on the cluster
docker stack deploy -c docker-compose.yml getstartedlab
Now you can access your app from the IP address of either myvm1 or myvm2.
The reason both IP addresses work is that nodes in a swarm participate in an ingress routing mesh. This ensures that a service deployed at a certain port within your swarm always has that port reserved to itself, no matter what node is actually running the container. Here’s a diagram of how a routing mesh for a service called my-web published at port 8080 on a three-node swarm would look:

You can tear down the stack with docker stack rm. For example:
docker stack rm getstartedlab
More About Stacks
A stack is a group of interrelated services that share dependencies, and can be orchestrated and scaled together. A single stack is capable of defining and coordinating the functionality of an entire application (though very complex applications may want to use multiple stacks).
Adding a New Service
It’s easy to add services to our docker-compose.yml file. First, let’s add a free visualizer service that lets us look at how our swarm is scheduling containers.
version: "3"
services:
  web:
    # replace username/repo:tag with your name and image details
    image: username/repo:tag
    deploy:
      replicas: 5
      restart_policy:
        condition: on-failure
      resources:
        limits:
          cpus: "0.1"
          memory: 50M
    ports:
      - "80:80"
    networks:
      - webnet
  visualizer:
    image: dockersamples/visualizer:stable
    ports:
      - "8080:8080"
    volumes:
      - "/var/run/docker.sock:/var/run/docker.sock"
    deploy:
      placement:
        constraints: [node.role == manager]
    networks:
      - webnet
networks:
  webnet:
The only thing new here is the peer service to web, named visualizer. Notice two new things here: a volumes key, giving the visualizer access to the host’s socket file for Docker, and a placement key, ensuring that this service only ever runs on a swarm manager – never a worker. That’s because this container, built from an open source project created by Docker, displays Docker services running on a swarm in a diagram.
We talk more about placement constraints and volumes in a moment. Make sure your shell is configured to talk to myvm1. Run docker-machine ls to list machines and make sure you are connected to myvm1, as indicated by an asterisk next to it. If needed, re-run docker-machine env myvm1. Now, re-run the docker stack deploy command on the manager, and whatever services need updating are updated
$ docker stack deploy -c docker-compose.yml getstartedlab
Updating service getstartedlab_web (id: angi1bf5e4to03qu9f93trnxm)
Creating service getstartedlab_visualizer (id: l9mnwkeq2jiononb5ihz9u7a4)
Now you can take a look at the visualizer in your browser at port 8080. Does the display match what you would expect?
Adding One More Service
Let’s add Redis database for storing app data. Modify docker-compose.yml
version: "3"
services:
  web:
    # replace username/repo:tag with your name and image details
    image: username/repo:tag
    deploy:
      replicas: 5
      restart_policy:
        condition: on-failure
      resources:
        limits:
          cpus: "0.1"
          memory: 50M
    ports:
      - "80:80"
    networks:
      - webnet
  visualizer:
    image: dockersamples/visualizer:stable
    ports:
      - "8080:8080"
    volumes:
      - "/var/run/docker.sock:/var/run/docker.sock"
    deploy:
      placement:
        constraints: [node.role == manager]
    networks:
      - webnet
  redis:
    image: redis
    ports:
      - "6379:6379"
    volumes:
      - "/home/docker/data:/data"
    deploy:
      placement:
        constraints: [node.role == manager]
    command: redis-server --appendonly yes
    networks:
      - webnet
networks:
  webnet:
Redis has an official image in the Docker library and has been granted the short image name of just redis, so no username/repo notation here. The Redis port, 6379, has been pre-configured by Redis to be exposed from the container to the host, and here in our Compose file we expose it from the host to the world, so you can actually enter the IP for any of your nodes into Redis Desktop Manager and manage this Redis instance, if you so choose.
Most importantly, there are a couple of things in the redis specification that make data persist between deployments of this stack:
redisalways runs on the manager, so it’s always using the same filesystem.redisaccesses a directory in the host’s file system that is linked to the directory/datainside the container, which is where Redis stores data.
Together, this is creating a “source of truth” in your host’s physical filesystem for the Redis data. Without this, Redis would store its data in /data inside the container’s filesystem, which would get wiped out if that container were ever redeployed.
This source of truth has two components:
- The placement constraint you put on the Redis service, ensuring that it always uses the same host.
- The volume you created that lets the container access
./data(on the host) as/data(inside the Redis container). While containers come and go, the files stored on./dataon the specified host persists, enabling continuity.
You are ready to deploy your new Redis-using stack. Create a ./data directory on the manager
docker-machine ssh myvm1 "mkdir ./data"
Run docker stack deploy one more time
docker stack deploy -c docker-compose.yml getstartedlab
And visit the web page that you serve on the manager in your browser.
Afterword
You have completed two tutorials on virtualization. In the next classes, you are going stick with vagrant to create virtual machines. If you decide to try using Docker for the next several lab sessions - you have this freedom, but you will be on your own (no technical support).
Links
Docker Tutorial: Troubleshooting
I have installed Docker Toolbox, but starting script fails
If your starting script fails with a message saying that it cannot find docker-machine.exe or vboxmanage.exe, open the script itself, i.e. C:\Program Files\Docker Toolbox\start.sh and enter respective paths explicitly.
Docker Toolbox cannot download boot2docker.iso image
Docket Toolbox installation comes with boot2docker.iso. Locate it in C:\Program Files\Docker Toolbox\boot2docker.iso and copy it to C:/Users/User/.docker/cache
docker-machine does not see Virtual box
You will see similar error
Running pre-create checks...
Error with pre-create check: "VBoxManage not found. Make sure VirtualBox is installed and VBoxManage is in the path"
Command eval $(sudo docker-machine env myvm1) does not do what I want
Solution: configure Docker to work without sudo
docker-machine does not work without sudo
Some problems with Docker arise from the snap version of Docker application. If your version is installed in the form of snap container, remove it and install the latest version from the web site.
After shutting down workers, cannot use swarm, it says that certificate has expired
docker-machine complains on lack of virtualization support
If you run Docker on VM, make sure nested virtualization is enabled for your VM.
If you work on you host machine, make sure virtualization is enambed in BIOS.
Some versions of Windows do not support virtualization.
Error example:
$ docker-machine create --driver virtualbox myvm1

Running pre-create checks...
Error with pre-create check: "This computer doesn't have VT-X/AMD-v enabled. Enabling it in the BIOS is mandatory"
docker-machine does not work on mac
Sometimes after starting the docker-machine on mac you will get the message Killed. This likely means that docker-machine execution was blocked by your privacy settings. Go to Settings, Privacy and Security, General tab, and allow the evecution of docker-machine.
Containers stuck in Ready state
Verify the integrity of the container that you have pushed into the repository
Self-check Questions
Useful resourse: Docker Documentation
- Is this statement correct: You can’t create multiple containers from the same image?
- Is this statement correct: All containers running on a single machine share the same operating system kernel, so they start instantly and make more efficient use of RAM.
- Is this statement correct: Containers include the application and all of its dependencies, but share the kernel with other containers. They run as an isolated process in userspace on the host operating system. They’re also not tied to any specific infrastructure – Docker containers run on any computer, on any infrastructure, and in any cloud.
- Fill in a blank: ________ is a cloud-hosted service from Docker that provides registry capabilities for public and private content
- Fill in a blank: ________ is a tool for defining and running multi-container Docker applications.
- Fill in a blank: ________ is native clustering for Docker. It turns a pool of Docker hosts into a single, virtual Docker host.
- Fill in a blank: ________ is a text document that contains all the commands a user could call on the command line to assemble an image
- Explain Docker command:
docker exec -it container_id bash - Explain Docker command:
docker build -t my_user/repo_name:1.0 - Explain Docker command:
docker commit -m "My first update" container_ID user_name/repository_name - Explain Docker command:
docker push user_name/repository_name - Explain Docker command:
docker ps - Explain Docker command:
docker images - Explain Docker command:
docker ps -a - Which command runs a Docker container?
- Which command stops Docker a container?
- Which command deletes a Docker container?
- Which command deletes a Docker image?
Acceptance criteria:
- Understanding of what you did
- Image loaded to docker hub
- Stack deployed to 2 VMs in the swarm
- Visualizer container running relevant web page from the host machine
- Hello web page opens from the host (from both VM IPs)
- Counter from Redis works
Bash
by Boris
Unix/OS/bash
Introduction
Here you will become familiar with tools that “red eyes” community (a.k.a. Linuxoids) have to use every day.
Whenever you read manuals, symbol $ usually signifies the beginning of a bash command. For example:
$ echo hello
That means the author expects that you will type “echo hello” in a bash-compatible shell and, probably, execute it.
$ man
man - bash command - utility to get description of bash commands in bash console.
Usage
$ man man
Outcome
manual for “man” command
Output
  "man is the system's manual pager.  Each page argument given to  man  is
   normally  the  name of a program, utility or function.  The manual page
   associated with each of these arguments is then found and displayed."
(pay ATTENTION to RED WORDS)

Practice
execute commands like:
$ man ssh
$ man 1 strcpy
$ man 3 strcpy # c library function documentation.
$ man rm #  After dash in bash goes not executable comments rm -r /
Google this command by yourself
$ sudo rm -rf /
Do you want to execute this? Hint: you do not!
UNIX shell
Shell is a text user interface (TUI) for accessing operating system’s services. It has many implementations: bash shell, original Unix shell, Bourne shell, ksh, csh, zsh, fish, etc.
Typical shell for ubuntu is bash you know it as Terminal. Hotkey: Ctrl + Alt + T
Questions
- What happens if type Ctrl + Shift + T in opened terminal?
- How changes state of terminal if invoke command like $ gedit
- if invoke $ gedit &
- behavior if close terminal after $ gedit&
Attention: there are several methods to close terminal (Alt + F4, Ctrl + D, exit command, etc) and, as was found, at least two behaviours. Describe your actions and their consequences. For curiosity kittens :3 link - SIGKILL, SIGSTOP, SIGTERM…
Processes
Explore by yourself about
$ ps
$ pstree
$ kill
Advanced. Addition
Foreground processes block shell during execution and background do not. Appending & will run process in background.
$ gedit &
Foreground process can be suspend by ctrl+z
$jobs # display list of jobs.
Advanced practice #1
Try to close process of command:
$ gedit &
Basic commands
Shell - File system commands
pwd - Print name of current/working directory.
mkdir <dirname> - Make directory.
cd <path> - Change directory.
rm <filenames> - Remove a file.
rm -r <dirname> - Remove (recursive) a directory.
ls - List content of a directory.
mv <old_path> <new_path> - Move file.
cat <filenames> - Concatenate files to stdout.
Shell - File System - Special Characters
~ - home directory
. - represent current directory
… - represent parent directory of current directory
Examples:
$ cd .. # go previous directory
$ ls . # list all files in current directory
$ cd ~ # go to home directory. What is the path of home directory?
Advanced. Streams and Pipelines.
Standard streams are preconnected communication channels of programs. They are:
- stdin - standard input that going into program,
- stdout - standard out where program writes output,
- stderr - to display error messages.
Usage in python
This code redirects all output of console to the system’s trash file (/dev/null) and saves person’s PC from one of Memory Leack case (critically if code checks for contest like pcms by S.Protasov)
class HidePrints:
    def __enter__(self):
        self._original_stdout = sys.stdout
        sys.stdout = open(os.devnull, 'w')

    def __exit__(self, exc_type, exc_val, exc_tb):
        sys.stdout.close()
        sys.stdout = self._original_stdout

# ...

with HidePrints():
    executeCodeWithFloodyOutput('drop')
Advanced practice #2
Redirect output (for example errors) to the file on your PC (like custom log file)
Bash redirect
It is possible to redirect streams to or from files with > and <
$ ls > list.txt # Save list of files in current directory to list.txt
$ head -n 3 < file.txt # Display the first 3 entries.
It is possible to redirect output of one program to input of another by | (pipe symbol)
$ ls | sort -r | tail -n 3
Command above receives list of files, reverse sort and display the 3 last.
Excercises
Ex1
Create directory “week1” in home directory.
$ mkdir ~/week1
$ cd ~/week1
List entries in /usr/bin that contain “gcc” in reverse alphabetical order. Save results in “~/week1/ex1.txt”.
Hint: use $ grep utility (https://docs.oracle.com/cd/E19455-01/806-2902/6jc3b36dn/index.html)
Ex2
Execute command
$ history -c # to clear history of your bash commands
Then execute some commands
## for example
$ echo "hello"
$ mkdir ~/hello
$ cd hello
$ ping -c 4 8.8.8.8 >> log.txt
$ cp log.txt ..
$ cd ..
$ cat log.txt
$ rm -r hello
$ rm log.txt
$ echo done
Then save history to “~/week1/ex2.txt”.
$ history | cut -c 8- > ex2.txt
Ex2 (Continue)
Change ex2.txt file to run it from console. Such a file named as Bash script (often with .sh extension). Use guide like this: http://omgenomics.com/writing-bash-script/
(step 1-5)
Execute your script.
~/.bashrc
.bashrc is a shell script that Bash runs whenever it is started interactively. It initializes an interactive shell session. You can put any command in that file that you could type at the command prompt.
You put commands here to set up the shell for use in your particular environment, or to customize things to your preferences. A common thing to put in .bashrc are aliases that you want to always be available.
Alias
In computing, alias is a command in various command line interpreters (shells) which enables a replacement of a word by another string. For example:
$ alias copy='cp'
then you can use
$ copy file file2 #instead of cp file file2
Self study
Can we use this tools to execute Windows scripts on Linux?
Variables
Variables - pairs of key value in bash and used like:
$ echo $PATH
where $PATH substitutes variable
ENVIRONMENT
When a program is invoked it is given an array of strings called the environment. This is a list of name-value pairs, of the form name=value.
Executed commands inherit the environment. The $ export command allow parameters and functions to be added to and deleted from the environment. Removed by the $ unset
$ export KEK=$HOME"/kek"
$ mkdir KEK
Then open or rerun Terminal and paste:
$ echo $KEK
As result it should just print empty string. This is because environment not keeps lust state. To make default state repeatable, we add such a commands in ~/.bashrc file. You can do it in editor (but this file is hidden as all files started with dot in Unix) or add to end of file with command:
$ echo "export KEK=$HOME\"/kek\"" >> ~/.bashrc
Than you will open Terminal next time, variable KEK will be accessible again.
More materials here
The PATH Environment Variable
The PATH environment variable has a special format. Let’s see what it looks like:
$ echo $PATH
It’s essentially a : separated list of directories. When you execute a command, the shell searches through each of these directories, one by one, until it finds a directory where the executable exists. We can find ls in /bin, right? /bin is the second item in the PATH variable. So let’s remove /bin from PATH. We can do this by using the export command:
$ export PATH=/usr/local/bin:/usr/bin:/sbin:/usr/sbin:
Make sure that the variable is set correctly:
$ echo $PATH
Now, if we try to run ls, the shell no longer knows to look in /bin!
$ ls # -bash: ls: command not found
As expected, ls can no longer be found. More details here
Ex 3
Modify your ~/.bashrc file to use such a aliasing tools (at least “cp” to “copy” aliasing).
Provide your modifications from ~/.bashrc
Can “one of my friends” use information from your ~/.bashrc to hack you?
Read by your own
What is responsibility of default linux folders? rus
Why everything in linux is file? For example $ ls /proc will introduce you all processes and its information. Is Windows the same?
P.S. “Holy Grail” of sysadmins or just logs
Each program generates something output (at least return code). It help programmers to understand what happens inside program. The best practice is to use logs. There is no universal solution how to organize or store logs. Some programs store them in system folders (e.g. dpkg tool that installs packages in linux uses /var/log/dpkg.log file)
Pay attention to this link
$ cat /var/log/dpkg.log # use tail and pipe to short it by yourself :3
Use logs, analyse logs, google error messages from logs, share logs with friends, subscribe on logs, put likes to logs. Don’t rush in tg till you read logs ;)
Networks
How TCP/IP stack looks like.

Behind this idea is layered architecture. Each layer has own set of commands (interface), error checking, information delivery addresses and useful data part.
Data frame (restored from raw bits) can be represented like 
or like this

That means each website you visit, delivered to your machine by packets like this. Their packet varies from ~60 Bytes to ~64 KBytes. Moodle dashboard weights ~3.4 MB for me. Think about this values.
DS students should be familiar with that because often their (your) work depend on virtualization technologies such that Virtual Machines, remote desktop (ssh), private/virtual networks.
It is too hard to shortly explain 1 semester Tanenbaum based course at single page, so learn such a topics by yourself:
- IP
- Port
- DNS
- Bridges (device and network virtualization)
- NAT (Network Address Translation)
And then answer the questions.
Useful links:
THE MOST IMPORTANT FOR U, VirtualBox guidelines
Tanenbaum (use index)
Good slides
Excercises
Now you are ready to complete 13 questions from moodle.
Network tools
wget/curl
wget and curl are command-line programs that let you fetch a URL. Unlike a web browser,
which fetches and executes entire pages, wget and curl give you control over exactly which
URLs you fetch and when you fetch them.
$ wget http://innopolis.ru
$ curl http://innopolis.ru
This will fetch the resource and either write it to a file (wget) or to the screen (curl)
ping
ping is a standard command-line utility for checking that another computer is responsive. It is widely used for network troubleshooting and comes pre-installed on Window, Linux, and Mac. While ping has various options, simply issuing the command
ping www.bing.com
will cause your computer to send a small number of ICMP ping requests to the remote computer (here www.bing.com), each of which should elicit an ICMP ping response.
traceroute
traceroute is a standard command-line utility for discovering the Internet paths that your computer uses. It is widely used for network troubleshooting. It comes pre-installed on Window and Mac, and can be installed using your package manager on Linux. On Windows, it is called “tracert”. It has various options, but simply
issuing the command
traceroute university.innopolis.ru
will cause your computer to
find and print the path to the remote computer (here university.innopolis.ru).
If you are on Linux / Mac and behind a NAT (as most home users or virtual machine users) then
use the –I option (that was a capital i) to traceroute, e.g.,
traceroute –I university.innopolis.ru
This will cause traceroute to send ICMP probes like tracert instead of its usual UDP probes; ICMP probes are better able to pass through NAT boxes.
ifconfig
ifconfig stands for “interface configuration”. It is used to view and change the configuration of the network interfaces on your system. Helps to explore addresses and names of networks and virtual networks of your machine. Also in
$ man ifconfig
you can find another utilities how to use this tool to modify network interfaces.
ssh
SSH a.k.a. Secure Shell or Secure Socket Shell, is a network protocol that gives users, particularly system administrators, a secure way to access a computer over an unsecured network. SSH also refers to the suite of utilities that implement the SSH protocol. Secure Shell provides strong authentication and encrypted data communications between two computers connecting over an open network such as the internet. SSH is widely used by network administrators for managing systems and applications remotely, allowing them to log into another computer over a network, execute commands and move files from one computer to another.
The most basic use of SSH is for connecting to a remote host for a terminal session. The form of that command is:
$ ssh UserName@SSHserver.example.com
# or
$ ssh myPCName@192.168.0.1 #where 192.168.0.1 is myPCName's IP.
Other tools
Look for $ netcat (the most useful for future works), $ netstat and $ scp by your own.
Read by your own
- Socket connection
- OSI model
- Default ports
- localhost
- /etc/network
Shared folders
The easiest way to share files between your host and guest machines. Only loosers use TG to share files btw your machines. There is no silver bullet for every hypervisor how to work with shared folder, so there no guides, but keep it in mind when you will work with files passing.