Lab 4 - Apache Hadoop HDFS
Course: Big Data - IU
Author: Firas Jolha
Agenda
Prerequisites
- Installed Docker and Docker compose
- Experience with HDFS
- Background in Hadoop and its components
Objectives
- Install Hadoop
- Setup multi-node cluster of HDFS nodes
- Setup HDFS components
- Hadoop HDFS configuration
Introduction
The Apache Hadoop software library is a framework that allows for the distributed processing of large data sets across clusters of computers using simple programming models. It is designed to scale up from single servers to thousands of machines, each offering local computation and storage. Rather than rely on hardware to deliver high-availability, the library itself is designed to detect and handle failures at the application layer, so delivering a highly-available service on top of a cluster of computers, each of which may be prone to failures.
Here we will discuss the core components of Hadoop, namely the Hadoop Distributed File System (HDFS), Yet Another Resource Negotiator (YARN) and next lab we will discucss MapReduce framework.
Hadoop HDFS
The Hadoop Distributed File System (HDFS) is highly fault-tolerant and is designed to be deployed on low-cost hardware. HDFS provides high throughput access to application data and is suitable for applications that have large data sets. HDFS is part of the Apache Hadoop Core project.
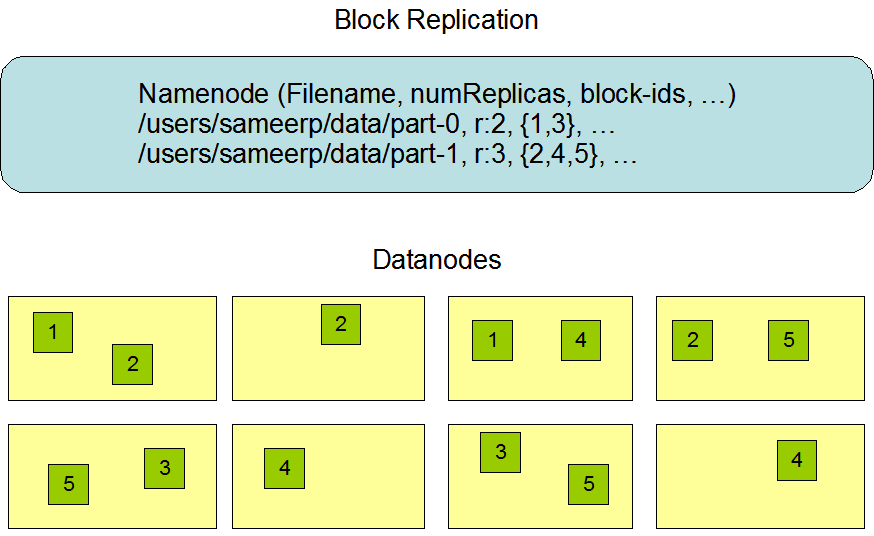
HDFS is a software-based filesystem implemented in Java and it sits on top of the native filesystem. The main concept behind HDFS is that it divides a file into blocks (typically 128 MB) instead of dealing with a file as a whole. This allows many features such as distribution, replication, failure recovery, and more importantly distributed processing of the blocks using multiple machines. For a 1 GB file with 128 MB blocks, there will be (1024 MB/128 MB) equal to eight blocks. If you consider a replication factor of three, this makes it 24 blocks.
HDFS provides a distributed storage system with fault tolerance and failure recovery. HDFS has two main components: the NameNode and the DataNode.
NameNode and DataNodes
HDFS has a master/slave architecture. An HDFS cluster consists of a single NameNode, a master server that manages the file system namespace and regulates access to files by clients. In addition, there are a number of DataNodes, usually one per node in the cluster, which manage storage attached to the nodes that they run on. HDFS exposes a file system namespace and allows user data to be stored in files. Internally, a file is split into one or more blocks and these blocks are stored in a set of DataNodes.
The NameNode executes file system namespace operations like opening, closing, and renaming files and directories. It also determines the mapping of blocks to DataNodes. The DataNodes are responsible for serving read and write requests from the file system’s clients. The DataNodes also perform block creation, deletion, and replication upon instruction from the NameNode.
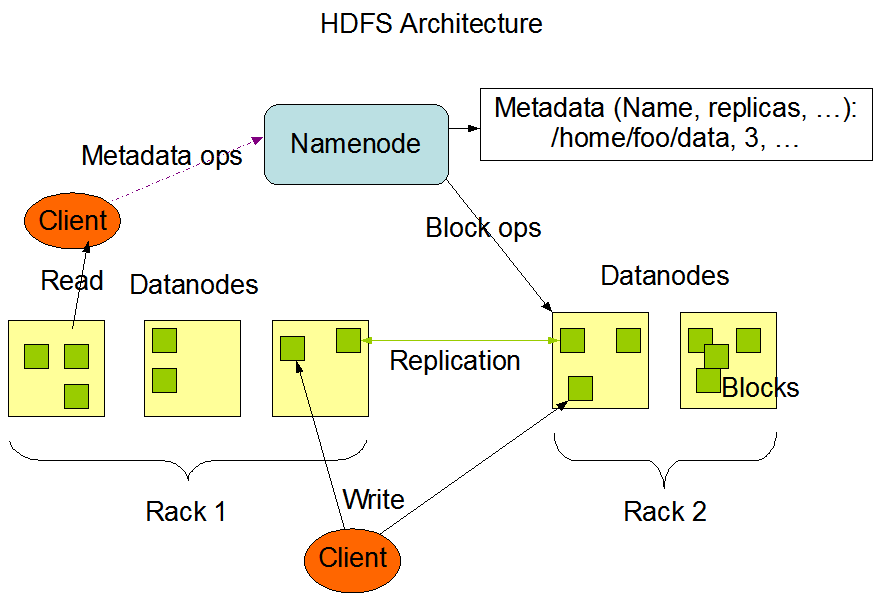
The NameNode and DataNode are pieces of software designed to run on commodity machines. These machines typically run a GNU/Linux operating system (OS). HDFS is built using the Java language; any machine that supports Java can run the NameNode or the DataNode software. Usage of the highly portable Java language means that HDFS can be deployed on a wide range of machines. A typical deployment has a dedicated machine that runs only the NameNode software. Each of the other machines in the cluster runs one instance of the DataNode software. The architecture does not preclude running multiple DataNodes on the same machine but in a real deployment that is rarely the case.
The existence of a single NameNode in a cluster greatly simplifies the architecture of the system. The NameNode is the arbitrator and repository for all HDFS metadata. The system is designed in such a way that user data never flows through the NameNode.
HDFS supports a traditional hierarchical file organization. A user or an application can create directories and store files inside these directories. The file system namespace hierarchy is similar to most other existing file systems; one can create and remove files, move a file from one directory to another, or rename a file. HDFS supports user quotas and access permissions. HDFS does not support hard links or soft links.
The NameNode maintains the file system namespace. Any change to the file system namespace or its properties is recorded by the NameNode. An application can specify the number of replicas of a file that should be maintained by HDFS. The number of copies of a file is called the replication factor of that file. This information is stored by the NameNode.
HDFS stores each file as a sequence of blocks. The blocks of a file are replicated for fault tolerance.
The HDFS namespace, containing file system metadata, is stored in the NameNode. Every change in the file system metadata is recorded in an EditLog, which persists transactions like file creations. The EditLog is stored in the local file system. The entire file system namespace, including block-to-file mapping and attributes, is stored in a file called FsImage. This file is also saved in the local file system where the NameNode resides. The Checkpoint process involves reading the FsImage and EditLog from disk at NameNode startup. All transactions in the EditLog are applied to the in-memory FsImage, which is then saved back to disk for persistence. After this process, the old EditLog can be truncated.
Setup Hadoop HDFS
You can setup your Hadoop cluster in one of the two supported modes for distributed clusters:
- Pseudo-distributed mode: Here Hadoop will run on a single-node where each Hadoop daemon runs in a separate Java process.
- Fully-Distributed mode: Here Hadoop will run on multiple machines where each machine will host one or more of the Hadoop components.
1. Pseudo-distributed mode
You can run a single node of Apache Hadoop using Docker as follows (pseudo-distributed mode).
- Pull a Linux image such as Ubuntu 20.04 and setup this image with ssh access.
docker pull ubuntu:20.04
# Dockerfile

# Use the official image as a parent image
FROM ubuntu:20.04

# Update the system, install OpenSSH Server, and set up users
RUN apt-get update && apt-get upgrade -y && \
    apt-get install -y openssh-server

# Create user and set password for user and root user
RUN  useradd -rm -d /home/ubuntu -s /bin/bash -g root -G sudo -u 1000 ubuntu && \
    echo 'root:root' | chpasswd

# Set up configuration for SSH
RUN mkdir /var/run/sshd && \
    sed -i 's/PermitRootLogin prohibit-password/PermitRootLogin yes/' /etc/ssh/sshd_config && \
    sed 's@session\s*required\s*pam_loginuid.so@session optional pam_loginuid.so@g' -i /etc/pam.d/sshd && \
    echo "export VISIBLE=now" >> /etc/profile

# Expose the SSH port
EXPOSE 22

# Run SSH
CMD ["/usr/sbin/sshd", "-D"]
And build it.
docker build -t ubuntu-ssh .
- Run a container and access it.
docker run --name hadoop_single_node \
                -p  8088:8088 \
                -p  8080:8080 \
                -p 8042:8042 \
                -p 4040:4040 \
                -p 4041:4041 \
                -p 9000:9000 \
                -p 9870:9870 \
                -p 9868:9868 \
                -p 19888:19888 \
                -itd ubuntu-ssh

docker exec -it hadoop_single_node bash
This will run a docker container from Ubuntu image and all these ports are published such that we can access the services of Hadoop.
- Install Java 8, openssh server and any other packages you prefer.
apt-get update && apt-get -y dist-upgrade && apt-get install -y openssh-server wget openjdk-8-jdk vim && apt-get -y update
- Set JAVA_HOME environment variable.
echo "export JAVA_HOME=/usr/lib/jvm/java-8-openjdk-amd64" >> /etc/profile

source /etc/profile
- Download Hadoop
wget -O /hadoop.tar.gz http://archive.apache.org/dist/hadoop/core/hadoop-3.3.1/hadoop-3.3.1.tar.gz
- Unzip it and store it in somewhere (we will call it hadoop home directory)
tar xfz hadoop.tar.gz
mv /hadoop-3.3.1 /usr/local/hadoop
rm /hadoop.tar.gz
- Set Hadoop home directory.
echo "export HADOOP_HOME=/usr/local/hadoop" >> /etc/profile
source /etc/profile
- Add Hadoop binaries to system PATH.
echo "export PATH=$PATH:$HADOOP_HOME/bin:$HADOOP_HOME/sbin" >>  /etc/profile

source /etc/profile
- Create directories for storing data in the namenode and datanodes.
mkdir -p $HADOOP_HOME/hdfs/namenode
mkdir -p $HADOOP_HOME/hdfs/datanode
- Configuring Hadoop
<!-- $HADOOP_HOME/etc/hadoop/core-site.xml -->
<configuration>
    <property>
        <name>fs.defaultFS</name>
        <value>hdfs://localhost:9000</value>
    </property>
</configuration>
<!-- $HADOOP_HOME/etc/hadoop/hdfs-site.xml -->
<configuration>
    <property>
        <name>dfs.replication</name>
        <value>1</value>
    </property>
</configuration>
- Check that you can ssh to the localhost without a passphrase.
ssh localhost
If you cannot ssh to localhost without a passphrase, execute the following commands:
ssh-keygen -t rsa -P '' -f ~/.ssh/id_rsa
cat ~/.ssh/id_rsa.pub >> ~/.ssh/authorized_keys
chmod 0600 ~/.ssh/authorized_keys
Also add the following to ~/.shh/config file.
Host *
  StrictHostKeyChecking no
  UserKnownHostsFile /dev/null
  LogLevel ERROR
And the following to the file $HADOOP_HOME/etc/hadoop/hadoop-env.sh.
export HADOOP_SSH_OPTS="-o UserKnownHostsFile=/dev/null -o StrictHostKeyChecking=no"
- Specify configuration for Hadoop binaries in the file (
$HADOOP_HOME/etc/hadoop/hadoop-env.sh).
export JAVA_HOME=/usr/lib/jvm/java-8-openjdk-amd64

export HADOOP_HOME=/usr/local/hadoop

# Make sure that you defined a username for services.
export HDFS_NAMENODE_USER="root"
export HDFS_DATANODE_USER="root"
export HDFS_SECONDARYNAMENODE_USER="root"
export YARN_RESOURCEMANAGER_USER="root"
export YARN_NODEMANAGER_USER="root"

export HADOOP_SSH_OPTS="-o UserKnownHostsFile=/dev/null -o StrictHostKeyChecking=no"
- Format the HDFS file system (only for the first time installation). This will delete everything in HDFS.
hdfs namenode -format
- Start NameNode daemon and DataNode daemon
start-dfs.sh
The hadoop daemon log output is written to the $HADOOP_LOG_DIR directory (defaults to $HADOOP_HOME/logs).
15. Browse the web interface for the NameNode; by default it is available at:
- NameNode - http://localhost:9870/
- Test some HDFS commands.
hdfs fsck /
- When you are done, stop HDFS daemons.
stop-dfs.sh
2. Fully-distributed mode
Here I will run hadoop on a cluster of Docker containers. I will share here the repository where you can clone it to setup hadoop hdfs.
- Clone the repository https://github.com/firas-jolha/docker-spark-yarn-cluster.
mkdir -p ~/spark-test && cd ~/spark-test
git clone https://github.com/firas-jolha/docker-spark-yarn-cluster.git
cd docker-spark-yarn-cluster
Explore the files before you execute any scripts.
2. Run the script startHadoopCluster.sh
bash startHadoopCluster.sh <N>
# N is the number of datanodes to run
# bash startHadoopCluster.sh 2
This will create and setup a Hadoop cluster of 1 namenode (master) and N datanodes (slaves).
3. Access the cluster-master node and try to check if all services are running.
docker exec -it cluster-master bash

jps -lm
- When you are done. You can run the script
remove_containers.sh(CAUTION) which will remove all containers whose name containscluster. Be careful, if you have any containers that containsclusterin its name, will also be removed.
bash remove_containers.sh
Hadoop HDFS Configuration
Hadoop’s Java configuration is driven by two types of important configuration files:
- Read-only default configuration -
core-default.xml,hdfs-default.xml,yarn-default.xmlandmapred-default.xml. - Site-specific configuration -
etc/hadoop/core-site.xml,etc/hadoop/hdfs-site.xml,etc/hadoop/yarn-site.xmlandetc/hadoop/mapred-site.xml.
These configuration files are .xml files and they have the following structure:
<configuration>

    <property>
      <name>name1</name>
      <value>value1</value>
    <description>description1</description>
    </property>

    <property>
      <name>name2</name>
      <value>value2</value>
      <description>description2</description>
    </property>

    .
    .
    .


</configuration>
Additionally, you can control the Hadoop scripts found in the bin/ directory of the distribution, by setting site-specific values via the etc/hadoop/hadoop-env.sh and etc/hadoop/yarn-env.sh.
After you modify the configuration files, you need to restart HDFS components as follows:
stop-dfs.sh
start-dfs.sh
core-site.xml
This file holds the core settings related to Hadoop components. Some of the properties are:
| property | default value | description |
|---|---|---|
| fs.defaultFS | file:/// | The name of the default file system. |
| io.file.buffer.size | 4096 | The size of buffer for use in sequence files. It determines how much data is buffered during read and write operations. |
You can find the description of each of the options provided by Hadoop HDFS and also the default values of theses options from this reference.
hdfs-site.xml
The file configures Hadoop HDFS. You can find it in ($HADOOP_HOME/etc/hadoop/hdfs-site.xml). Some of the properties are:
| property | default | description |
|---|---|---|
| dfs.blocksize | 134217728 | The default block size for new files, in bytes (128k, 512m, 1g, etc.) |
| dfs.replication | 3 | Default block replication |
| dfs.namenode.name.dir | file://${hadoop.tmp.dir}/dfs/name | Determines where on the local filesystem the DFS name node should store the name table(fsimage). |
| dfs.datanode.data.dir | file://${hadoop.tmp.dir}/dfs/data | Determines where on the local filesystem an DFS data node should store its blocks. |
| dfs.webhdfs.enabled | true | Enable WebHDFS (REST API) in Namenodes and Datanodes. |
| dfs.user.home.dir.prefix | /user | The directory to prepend to user name to get the user’s home direcotry. |
| dfs.permissions.enabled | true | If “true”, enable permission checking in HDFS. If “false”, permission checking is turned off, but all other behavior is unchanged. |
You can check here for all available properties with description.
Hadoop HDFS commands
Hadoop HDFS provides a set of commands to manage the files in the file system and also to manage the HDFS components.
DFS
Allows to run a filesystem command on the file system supported in Hadoop. The list of commands supported are available in the official website. You can check below some examples:

- Change block replicas
hdfs dfs -setrep [-R] [-w] <noOfReplicas> <path>
DFSAdmin
The DFSAdmin command set is used for administering an HDFS cluster. These are commands that are used only by an HDFS administrator.
- Put the cluster in safe mode
hdfs dfsadmin -safemode enter
# hdfs dfsadmin -safemode leave
Safe mode is a Namenode state in which it:
- does not accept changes to the name space (read-only)
- does not replicate or delete blocks.
Safe mode is entered automatically at Namenode startup, and leaves safe mode automatically when the configured minimum percentage of blocks satisfies the minimum replication condition. If Namenode detects any anomaly then it will linger in safe mode till that issue is resolved.
2. Generate a report of avilable datanodes
hdfs dfsadmin -report
- Recommission or decommission data nodes
hdfs dfsadmin -refreshNodes
- Runs the HDFS filesystem checking utility. (it is not dfsadmin command)
hdfs fsck <path>
hdfs fsck /
Apache Ozone
Ozone is a distributed object store optimized for Big data workloads. The primary design point of ozone is scalability, and it aims to scale to billions of objects and exabytes of capacity. Ozone achieves better scalability by separating namespace management from block space management.
- The namespace is managed by a daemon called Ozone Manager (OM) that handles namespace-related tasks, like managing volumes, buckets, and keys.
- The block space is managed by Storage Container Manager (SCM) that is responsible for managing the physical storage layer, including the data nodes and the blocks that form the data.
Namespace (volumes, buckets, and keys)
Ozone’s namespace is organized into a hierarchy of volumes, buckets, and keys.
- Volumes are similar to home directories and can only be created by an administrator.
- Buckets are contained within volumes. Users can create many buckets within a volume.
- Keys hold the actual data and reside within buckets.
This separation of the logical namespace from the physical storage layer is a key aspect of Ozone’s scalability.
Core components
The block diagram shows the core components of Ozone.
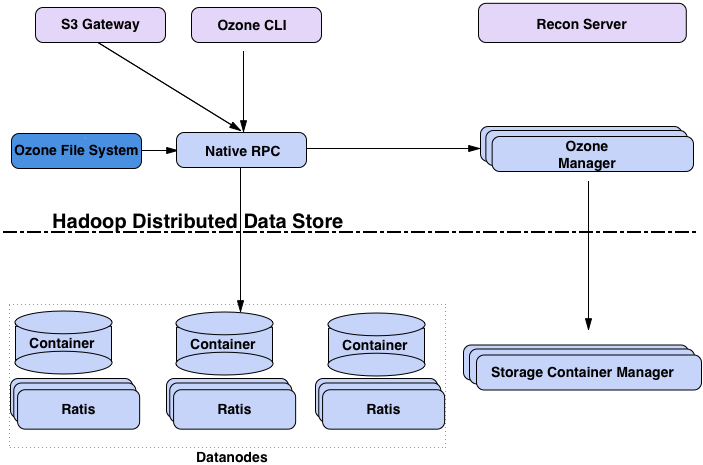
- The OM is the name space manager that handles client requests for creating, deleting, or looking up keys.
- SCM manages the physical data layer. It manages the Datanodes and the replication of data.
- Datanodes are responsible for storing the actual data, which is organized into logical units called blocks.
- Recon is the management user interface for Ozone to monitor and manage the Ozone cluster.
Another way to visualize Ozone is to look at the functional layers below:
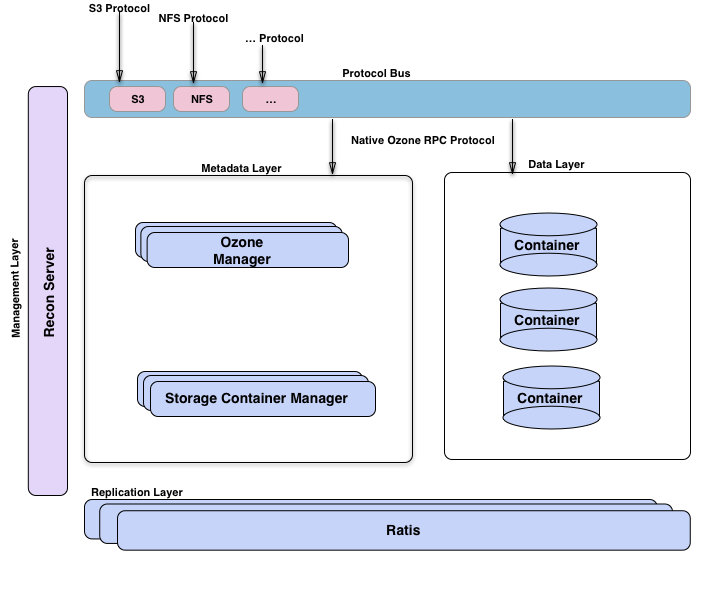
- A metadata data management layer, composed of Ozone Manager and Storage Container Manager.
- A data storage layer, which is basically the data nodes and they are managed by SCM.
- The replication layer, provided by Ratis is used to replicate metadata (OM and SCM) and also used for consistency when data is modified at the data nodes.
- A management server called Recon, that talks to all other components of Ozone and provides a unified management API and UX for Ozone.
- A protocol bus that allows Ozone to be extended via other protocols. Currently, it supports an S3-compatible protocol. Protocol Bus provides a generic notion that you can implement new file system or object store protocols on top of Ozone’s native protocol.
- Containers are the fundamental replication unit of Ozone, they are managed by the Storage Container Manager (SCM) service. Containers are big binary units (5Gb by default) which can contain multiple blocks.
Setup Apache Ozone
Here we follow only Docker approach but if you want to install a bare metal version, please check the documentation.
- Download the Docker Compose file from original source.
# Download the latest Docker Compose configuration file
curl -O https://raw.githubusercontent.com/apache/ozone-docker/refs/heads/latest/docker-compose.yaml
# Licensed to the Apache Software Foundation (ASF) under one
# or more contributor license agreements.  See the NOTICE file
# distributed with this work for additional information
# regarding copyright ownership.  The ASF licenses this file
# to you under the Apache License, Version 2.0 (the
# "License"); you may not use this file except in compliance
# with the License.  You may obtain a copy of the License at
#
#     http://www.apache.org/licenses/LICENSE-2.0
#
# Unless required by applicable law or agreed to in writing, software
# distributed under the License is distributed on an "AS IS" BASIS,
# WITHOUT WARRANTIES OR CONDITIONS OF ANY KIND, either express or implied.
# See the License for the specific language governing permissions and
# limitations under the License.

x-image:
   &image
   image: ${OZONE_IMAGE:-apache/ozone}:${OZONE_IMAGE_VERSION:-2.1.0}${OZONE_IMAGE_FLAVOR:-}

x-common-config:
   &common-config
   OZONE-SITE.XML_hdds.datanode.dir: "/data/hdds"
   OZONE-SITE.XML_ozone.metadata.dirs: "/data/metadata"
   OZONE-SITE.XML_ozone.om.address: "om"
   OZONE-SITE.XML_ozone.om.http-address: "om:9874"
   OZONE-SITE.XML_ozone.recon.address: "recon:9891"
   OZONE-SITE.XML_ozone.recon.db.dir: "/data/metadata/recon"
   OZONE-SITE.XML_ozone.replication: "1"
   OZONE-SITE.XML_ozone.scm.block.client.address: "scm"
   OZONE-SITE.XML_ozone.scm.client.address: "scm"
   OZONE-SITE.XML_ozone.scm.datanode.id.dir: "/data/metadata"
   OZONE-SITE.XML_ozone.scm.names: "scm"
   no_proxy: "om,recon,scm,s3g,localhost,127.0.0.1"

version: "3"
services:
   datanode:
      <<: *image
      ports:
         - 9864
      command: ["ozone","datanode"]
      environment:
         <<: *common-config
   om:
      <<: *image
      ports:
         - 9874:9874
      environment:
         <<: *common-config
         CORE-SITE.XML_hadoop.proxyuser.hadoop.hosts: "*"
         CORE-SITE.XML_hadoop.proxyuser.hadoop.groups: "*"
         ENSURE_OM_INITIALIZED: /data/metadata/om/current/VERSION
         WAITFOR: scm:9876
      command: ["ozone","om"]
   scm:
      <<: *image
      ports:
         - 9876:9876
      environment:
         <<: *common-config
         ENSURE_SCM_INITIALIZED: /data/metadata/scm/current/VERSION
      command: ["ozone","scm"]
   recon:
      <<: *image
      ports:
         - 9888:9888
      environment:
         <<: *common-config
      command: ["ozone","recon"]
   s3g:
      <<: *image
      ports:
         - 9878:9878
      environment:
         <<: *common-config
      command: ["ozone","s3g"]
   httpfs:
      <<: *image
      ports:
         - 14000:14000
      environment:
         <<: *common-config
         CORE-SITE.XML_fs.defaultFS: "ofs://om"
      command: [ "ozone","httpfs" ]
- Start your Ozone cluster with two Datanodes:
docker compose up -d --scale datanode=2om: Ozone Manager.scm: Storage Container Manager.datanode-1,datanode-2: Datanodes.recon: Recon UIs3g: Apache Ozone’s S3 Gateway (often called S3G) is a component that provides an Amazon S3-compatible REST interface for Ozone’s object store.httpfs: HttpFS is a service that provides a REST HTTP gateway supporting File System operations (read and write). You can usecurlhere to manage data in the store.
- Check the installation.
docker compose exec om ozone version
Now you are ready to use ozone service.
Reading and Writing Data in Ozone
Apache Ozone provides multiple interfaces for reading and writing data, catering to different use cases and client preferences. Here we explain how to use the two primary interfaces within a Docker environment:
- Ozone Shell (ozone sh) - The native command-line interface
- S3 API - Amazon S3 compatible REST interface
Using Ozone Shell (ozone sh)
Use Ozone shell to manage volumes/buckets/keys. Ozone shell commands take the following form:
ozone sh <object-type> <action> <path> [options]
Where <object-type> is volume, bucket, or key.
- Access the shell
docker compose exec om bash

# bash-5.1$
#
# Now you can run 'ozone sh' commands here
You can access the Recon UI service typically on the port 9888 (http://localhost:9888) to check the status of the object store.
- Working with Volumes
# Create a volume
ozone sh volume create /vol1

# List all volumes
ozone sh volume list /

# Get volume details
ozone sh volume info /vol1

# Delete a volume (must be empty)
ozone sh volume delete /vol1

# Delete a volume recursively (deletes all buckets and keys within the volume, then the volume itself)
# WARNING: No recovery option after using this command, and no trash for FSO (File System Optimized) buckets that are designed for high-performance Hadoop-compatible workloads. Requires confirmation.
ozone sh volume delete -r /vol1
- Working with Buckets
# First, create a volume (skip this step if the volume vol1 exists)
ozone sh volume create /vol1

# Buckets are containers for keys (objects) within volumes.

# Create a bucket
ozone sh bucket create /vol1/bucket1
# You cannot create bolumes inside volumes

# List all buckets in a volume
ozone sh bucket list /vol1

# Get bucket details
ozone sh bucket info /vol1/bucket1

# Delete a bucket (must be empty)
ozone sh bucket delete /vol1/bucket1

# Delete a bucket recursively (deletes all keys within the bucket, then the bucket itself)
# WARNING: No recovery option, deleted keys won't move to trash. Requires confirmation.
ozone sh bucket delete -r /vol1/bucket1
- Working with Keys (Objects)
# First, create a volume (skip this step if the volume vol1 exists)
ozone sh volume create /vol1


# Second, create a bucket (skip this step if the bucket bucket1 exists)
ozone sh bucket create /vol1/bucket1

# Keys are the actual data objects stored in Ozone.
# Create a test file locally
# echo "Hello Ozone via Shell" > test_shell.txt

# Upload a file (put source to destination)
ozone sh key put /vol1/bucket1/test_shell.txt test_shell.txt

# Upload with specific replication type
# For RATIS: use -r ONE or THREE
ozone sh key put -t RATIS -r THREE /vol1/bucket1/key1_ratis test_shell.txt
# For EC: use format CODEC-DATA-PARITY-CHUNKSIZE (e.g., rs-3-2-1024k, rs-6-3-1024k, rs-10-4-1024k)
ozone sh key put -t EC -r rs-3-2-1024k /vol1/bucket1/key1_ec test_shell.txt

# Download a file (get source to destination)
ozone sh key get /vol1/bucket1/test_shell.txt ./downloaded_shell.txt

# Force overwrite when downloading (use -f or --force)
ozone sh key get --force /vol1/bucket1/test_shell.txt ./downloaded_shell.txt

# Get key information
ozone sh key info /vol1/bucket1/test_shell.txt

# List keys in a bucket
ozone sh key list /vol1/bucket1

# Copy a key within Ozone (not directly supported, use put/get or other interfaces)

# Rename a key
ozone sh key rename /vol1/bucket1 test_shell.txt renamed_shell.txt

# Delete a key
ozone sh key delete /vol1/bucket1/renamed_shell.txt

# Note: In FSO buckets, deleted keys are moved to trash at /<volume>/<bucket>/.Trash/<user>
# In OBS (Object Store Buckets) buckets, deletion is permanent.
In Apache Ozone, Object Store (OBS) and File System Optimized (FSO) are two different bucket layout formats, designed for distinct use cases within the same distributed storage system.
- OBS is optimized for S3-compatible, flat-namespace, object-storage workloads.
- FSO is optimized for Hadoop Compatible File System (HCFS) workloads, supporting directory hierarchies and atomic operations.
Using S3 API
The S3 API provides compatibility with applications designed for Amazon S3. It’s accessible via the S3 Gateway service, typically running on port 9878 in the Docker setup. Ozone’s S3 Gateway acts as a REST front-end that speaks the S3 protocol and bridges it to the Ozone backend.
In Ozone, data is organized into volumes, buckets, and keys. By default, the S3 Gateway uses a special volume named /s3v to store all S3 buckets. Each S3 bucket created is represented as a bucket under the /s3v volume in Ozone. Objects (keys) are stored within those buckets. This mapping is transparent to the end user.
The S3 Gateway does the following:
- It receives S3 REST API calls from clients.
- It translates them and forwards metadata operations to OM. It translates REST S3 operations into native Ozone calls.
- It streams data directly to and from Datanodes. It doesn’t store or manage data – it delegates to OM and Datanodes.
Set S3 Credentials
In the default non-secure Docker setup, you can use any values for credentials. Run the following commands in the shell of om container.
export AWS_ACCESS_KEY_ID=testuser
export AWS_SECRET_ACCESS_KEY=testuser-secret
export AWS_ENDPOINT_URL=http://s3g:9878
Using AWS CLI
The AWS CLI can be used from your local machine (if installed) or from within a container that has it. Here we will use the container om container where aws CLI is installed.
# Create a bucket (maps to /s3v/<bucket-name> in Ozone namespace)
aws s3api create-bucket --bucket=s3bucket

# List buckets
aws s3api list-buckets


# Upload a file
# echo 'Hello S3' > s3_test.txt
aws s3 cp s3_test.txt s3://s3bucket/
# If you got errors, check the warning below.

# List objects in a bucket
aws s3 ls s3://s3bucket/

# Download a file
aws s3 cp s3://s3bucket/s3_test.txt ./downloaded_s3.txt

# Delete an object
aws s3 rm s3://s3bucket/s3_test.txt

# Delete a bucket (must be empty)
aws s3api delete-bucket --bucket=s3bucket
# aws s3 rb s3://s3bucket --force
aws s3vs.aws s3api:
Both commands provide different functionality, whereass3apisupports all of the functionality provided by S3,s3supports a limited and higher-level set of functionality. In essence, use theaws s3commands for daily object operations and theaws s3apicommands when you need direct control over specific S3 API functions.
Warning: If you are getting some errors related to replication configs. You can change the configs for a specific bucket as follows:
ozone sh bucket set-replication-config -r=2 /s3v/s3bucket
Warning: If you the SCM component is in safe mode, you can exit this mode as follows:
ozone admin safemode status
ozone admin safemode exit